
This homemade barbecue pizza recipe tastes like a gourmet pizza, but is so easy you can make it at home. Barbecue Chicken Pizza is a delicious twist on the traditional pizza that’s become so popular you can find it in the store’s freezer section…but if you make it yourself, you control the flavor and canRead More

Homemade Sour Cream
This Homemade Sour Cream Recipe has two ingredients and only takes a couple of minutes to prep. It’s foolproof, creamy, and great if you prefer to have control over what ingredients go into your food. Have you ever needed sour cream and discovered you were out? I sure have, and I was so excited thatRead More

Honey Baked Ham
This easy, homemade honey-baked ham recipe is perfect for holidays, family dinners, or anytime you want to impress without the stress. Skip the store-bought, overpriced honey hams this year! This easy homemade honey-baked ham gives you that same sweet, sticky, crowd-pleasing glaze without any fuss. We’re talking a juicy spiral-cut ham baked low andRead More

Homemade Pizza Dough
Store-bought pizza is convenient…just don’t look at the ingredient list! If you want to maximize the flavor and keep the contents simple, homemade pizza dough is the way to go! You don’t have to spin it in the air at all. Nothing beats the smell of fresh pizza baking in the oven, especially when theRead More

Homemade Mayonnaise
This easy Homemade Mayonnaise recipe takes just 5 minutes and uses simple ingredients you likely have on hand. Creamy, fresh, and better than store-bought. Making homemade mayonnaise may seem really difficult or complicated, but the truth is an immersion blender makes the job so simple, you’ll wonder why you haven’t done it before now. YouRead More

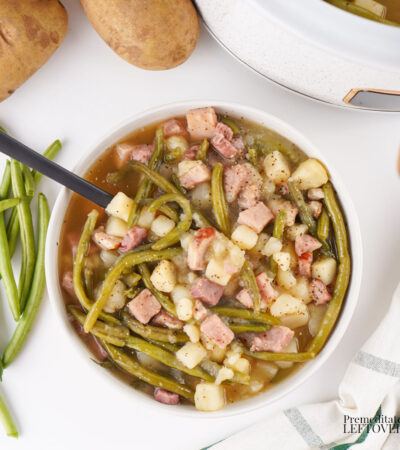
Corned Beef and Cabbage Soup
This Corned Beef and Cabbage Soup recipe is made with potatoes and carrots for a filling soup using leftover corned beef. There’s something deeply comforting about transforming holiday leftovers into a hearty, soul-warming meal, and this Corned Beef and Cabbage Soup does exactly that. Tender shreds of leftover corned beef mingle with sweet carrots, creamyRead More
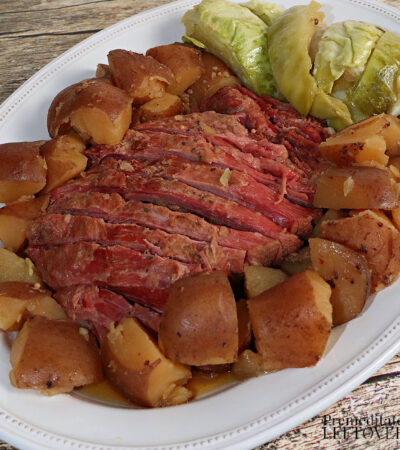
Slow Cooker Corned Beef and Cabbage
This easy slow cooker corned beef and cabbage recipe is made with red potatoes. There’s something undeniably comforting about a hearty plate of corned beef and cabbage. Tender slices of beef mingle with soft cabbage and those perfect little red potatoes that soak up all the savory flavors. While it’s often tied to St. Patrick’sRead More
Crock-Pot Potato and Ham Casserole
This easy Crock-Pot Potato and Ham Casserole Recipe is a simple, comforting family meal. Want a great way to use up leftover ham? Or maybe you need a comforting meal for the family without much effort. This hearty and easy Crock-Pot Potato and Ham Casserole recipe with green beans requires minimal prep, only a fewRead More

Crock-Pot Ham and Bean Soup
This Crock-Pot Ham and Bean Soup is perfect year-round, but it’s especially great after the holidays when you want to use up leftover ham. Crock-Pot Ham and Bean Soup is the perfect way to transform leftover ham into a wonderful, comforting meal. Just add pre-soaked white beans and let the slow cooker do the workRead More

Sheet Pan Chicken Fajitas
Here’s a Sheet Pan Chicken Fajitas Recipe that’s simple to prepare and perfect for a busy weeknight family dinner. Fajitas are popular for good reason. It’s hard to beat the taste of smoky, savory meat served piping hot on warm tortillas. This sheet pan fajitas recipe is full of flavor and simple to prepare. It’sRead More

Slow Cooker Beef and Broccoli
Treat yourself to Slow Cooker Beef and Broccoli on a busy weeknight. It’s better than takeout, and so simple to make! This slow cooker beef and broccoli reminds me of one of my favorite choices at Chinese restaurants. It’s loaded with beef and tender-crisp broccoli in a savory-sweet sauce. Served over noodles or rice andRead More

Crock-Pot Chuck Roast with Vegetables
This tender Crock-Pot Chuck Roast Recipe with Vegetables makes for a wonderful, hearty family dinner any day of the week. It’s a complete meal in one pot! If you prefer, I also have this Slow Cooker Cross Rib Roast Recipe that leaves out the vegetables. The warm, comforting aroma of chuck roast slow-cooking alongside heartyRead More

Carrot Cake
This carrot cake recipe includes applesauce, which creates a moist cake with less sugar and oil. Applesauce adds the perfect amount of moisture and sweetness, resulting in a moist cake that isn’t greasy and has less sugar. This lighter twist on classic carrot cake delivers all the cozy, spiced comfort you love while making aRead More

Crock-Pot Mexican Street Corn Soup
Meet your new favorite way to use fresh seasonal corn! This chowder-style Crock-Pot Mexican Street Corn Soup recipe comes out creamy, spicy, comforting, and flavorful. This chowder-style Mexican Street Corn Soup is spicy, flavorful, and just the thing to warm your insides after a day spent outdoors. It is a great way to use upRead More

Chicken Enchiladas
This chicken enchiladas recipe is easy and cheesy! Use up leftover chicken or rotisserie chicken to make this family-friendly southwestern feast! This delicious, family-friendly chicken enchilada recipe is so simple to put together that the kids can help! It makes a big batch, so it’s a good choice when the kids are going to haveRead More

Deviled Eggs
The deviled eggs recipe everyone asks for. Classic, easy, and always delicious. Deviled eggs are a classic dish at family gatherings! Serve them chilled on a platter for Easter, picnics, or potlucks. They pair perfectly with ham, salads, or grilled mains. This is the classic deviled eggs recipe that generations of deviled egg fans haveRead More

Keto Scrambled Eggs with Avocado
Enjoy rich, creamy Keto Scrambled Eggs with Avocado at any time of day. Serve with a crisp salad and fresh vegetables for a satisfying lunch or light supper. For whatever reason, having “breakfast for supper” is one of the most satisfying family meals. Everyone loves it, it’s quick and easy to make, and the heartyRead More

Slow Cooker White Lasagna
Instead of ground beef and marinara, this Slow Cooker White Lasagna uses cooked chicken and Alfredo sauce. It’s an easy and creamy alternative to traditional baked lasagna! Slow Cooker White Lasagna is a convenient and tasty twist on the classic red sauce oven-baked version. Alfredo sauce coats all the layers of seasoned ricotta, Italian cheeses,Read More

Peanut Butter Easter Eggs
Fun egg-shaped chocolate-peanut butter treats for Easter that use only three ingredients! This Peanut Butter Eggs recipe is so simple and delicious, everyone in the family will love it. It reminds me of the famous chocolate peanut butter cups, but better because they’re made at home. The best part is that the recipe only usesRead More

Crock-Pot Red Beans and Rice
This Southern-style Crock-Pot Red Beans and Rice recipe is not quite as spicy as Crock-Pot Cajun Beans and Rice, but just as tasty and just as easy! When I read the ingredients of this southern-style slow-cooker red beans and rice recipe, I can almost smell it cooking. Like many good southern recipes, the recipe includesRead More
- 1
- 2
- 3
- …
- 73
- Next Page »
