 My strawberries and raspberries are continuing to produce fruit, despite two nights of 27 degree temperatures. I combined strawberries and raspberries with some homegrown blackberries that I froze this summer to make my boys some jam.
When you make jam with honey you can use up to 1 cup of honey instead of sugar as long as you use No Sugar Needed Fruit Pectin. I use a combination of honey and fruit juice concentrate to sweeten my jam. Honey sweetened jam takes longer to set than jam made with sugar, but it does set within 24 hours. It’s also a little less sweet, but my family prefers it that way.
Ingredients:
2 cups mashed strawberries
1 cup mashed blackberries
1 cup mashed raspberries
1 Cup White Grape or Apple Juice Concentrate, thawed
1 – 1.75 pkg. Ball No Sugar Needed Fruit Pectin
1/2 – 1 cup honey (depending on desired sweetness)
1/2 teaspoon butter
Items that you need:
Boiling Water Canner or a large deep sauce pot, with a lid, and a rack (the first few times I canned I did not have a canner or a rack. I just put the insert from my pressure cooker on the bottom of a deep pot.)
6 – 8 ounce, clean, glass jars with NEW lids and bands (I used 3 – 16 ounce jars).
Nice to have, but not required (these are all in the picture):
Wide Mouth Funnel
Jar Lifter
Lid Lifter
Headspace Tool
Wash and dry berries. Hull the strawberries. The easiest way I know of to hull strawberries is to pierce the strawberry from the bottom with a firm straw. 
I do not slice the fruit. I just mash them with an old fashioned potato masher in a large, 8 cup measuring bowl. I mashed the strawberries, adding more until I have 2 cups. Then I add raspberries and mash until I have 3 cups. Then I follow up with blackberries and mash and continue to add more until I reach 4 cups. I then transfer the berries to a large pot and mash any large chunks that I see. 
Prepare the water canner by filling it half full with hot water. I add the jars and lids to the water, which I keep hot, but not boiling. Keep the jars and lids in the canner until you are ready to fill them. Leave the bands at room temperature. 
Combine mashed fruit with grape or apple juice concentrate. Gradually stir in the pectin. Add 1/2 teaspoon butter (this really does reduce the foaming!). Cook over high heat, stirring constantly. Bring mixture to a full rolling boil that cannot be stirred down.
Add honey to taste. Return mixture to a full, rolling boil. Boil hard for 3 minutes, stirring constantly. Remove from heat. Skim foam if you didn’t put in butter.
When the jam is done, I pull the jars and lids out of the canner and quickly dry them (but I don’t worry about getting every drop of water). Ladle the hot jam into the hot jars, leaving 1/4 inch of head space. 
Clean any jam from the rim and threads with a clean, damp cloth. Center the hot lids on the jars. Apply bands and tighten until they are fingertip tight.
Place filled jars in the canner. Be sure the water covers the tops of the jars by 1 – 2 inches. Add more hot water if necessary. 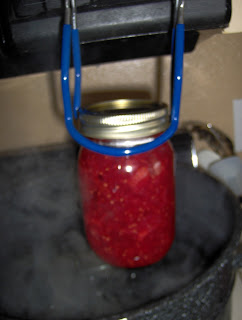
Place lid on canner. Bring the water to a gentle, steady boil. Boil the jars for 10 minutes adjusting for altitude if necessary (1001 – 3000 feet add 5 minutes, 3001 – 6000 feet add 10 minutes, 6001 – 8000 feet add 15 minutes, 8001 – 10,000 feet add 20 minutes).
After the processing is complete, turn off the heat and remove the lid from the canner. Let jars set for 5 minutes. Remove the jars from the canner and set upright on a towel to cool. Let them sit undisturbed for 12 – 24 hours.  After cooling, test seals by pressing the center of each lid. If a lid does not flex up and down, it is sealed. If a lid is not sealed after the 24 hour period, refrigerate the jar immediately. It will stay edible in the refrigerator for up to 3 weeks. If the jars are sealed, label them and store them in a cool, dry, dark place for up to a year.
I am planning on making a couple more batches of jam to get us through until next spring when our berries will begin producing again. Are you doing any canning this fall?
I am linking this post to Foodie Friday, Vegetarian Foodie Friday, Food on Friday, Friday Food, and Fight Back Friday.

Margie says
Can the ratios of fruit be altered on a recipe? For example can it be 2 cups blackberries and one cup strawberries and 1 cup blueberries?
Margie says
Can raspberries be substituted by blueberries?
Alea Milham says
Yes, they can.
Nicole Feliciano says
No canning here, but I love to read about it.These look glorious and would make a perfect gift at the holidays too.
Lisa says
I didn't know that honey could be used in jam-making as well. What a wonderful way to keep the sweetness but make this recipe more natural. Your jam has a gorgeous color.
Melinda says
I've never used a straw to hull strawberries – what a great hint!
Melodie says
Your jam looks awesome. I love homemade jam sooo much! In moving this year I didn't make any though. Boo hoo! Thanks so much for sharing at Vegetarian Foodie Fridays!
tamilyn says
My goal for next year is to learn how to can. No one in my family does it, so I bought a book on clearance this year. Crossing fingers…
Ann Kroeker says
What a fantastic tutorial!! Thank you so much for the photos to help someone like me who hasn't had a successful jam-making experience yet. Using a straw as a strawberry huller is awesome–easy to remember, too. 🙂
So glad you linked to Food on Fridays, so I can easily find this. I love jam.