How to Make Sugar Eggs
How to Make Sugar Eggs for Easter. Tutorial shows how to make sugar eggs with a panoramic scene inside. Includes recipe and decorating tips.
Ingredients
- 6 cups sugar regular or superfine. Here is how to make superfine sugar.
- 3 tablespoons water
- Food coloring
Instructions
- In a small dish, combine the water and enough food coloring to make a fairly rich color; it will appear lighter when mixed with the sugar.
- Place sugar in a large bowl and drizzle the colored water in a little at a time, mixing well with an electric mixer. Add more or less water to make a mixture that will hold together in your hand when you squeeze it. Make sure it is very well combined so you don’t get any dark spots on your finished egg.
- Pack the sugar firmly into plastic molds and level the top with a knife or spatula. Pat gently, and add more if necessary to achieve a firm, level top.
- Cover with a sturdy paper plate, piece of cardboard, or baking sheet. Holding firmly, flip over and lift the mold carefully away. If the egg is cracked, scrape it back into the bowl, stir in a little more water, and try again. (Keep unused sugar covered with plastic wrap.)
- If you are making an egg that will lie horizontally, take a sharp knife and cut the tip off of both pieces. The amount you cut off varies with the size of the mold, so just make sure to cut enough to make a generous view hole.
- For upright eggs: With a toothpick, mark a curved line between 1/4-inch and 1/2-inch from the top of the egg, following the curve. With a spoon, scoop a little bit out under the line where the view hole will be. This will make it a lot easier to work with when you are scooping out the egg.
- If you are making an upright egg, the mold should have a flat spot where the hole will be. After the egg is turned out of the mold, trace around the area with a toothpick and carefully scoop a small amount of the sugar out of the flat spot.
- Let the eggs sit. If you want a sturdy egg, let it sit 3 hours. If you want to make a thinner (but a little more fragile) egg which will let more light inside, let it sit 2 hours. Hint: If you plan to make royal icing flowers or Easter decorations, now would be the perfect time, because they need to dry for several hours. Instructions below.
- Pick up one egg half and turn it over, resting the curved top in the palm of one hand. With a spoon, beginning in the center, slowly scoop the soft sugar out. (This can be put back in the covered bowl and used for more eggs.) You will feel when you hit the hard crust. Go gently, scraping it smooth. For a horizontal egg: at the tip of the egg where you made the curved line, use a small sharp knife to gently scrape away any sugar outside of your line. When the two halves are put together, this is your peep hole! For an upright egg: you will need to carefully scrape out the opening in the center of the front half of the egg, using a small sharp knife. You may smooth it with a nail file if needed.
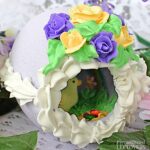
- To decorate a horizontal egg: It’s fun to put a little blue icing on inside of the top shell for sky, and add some white icing clouds. Put a layer of green on the inside of the bottom shell. Add edible Easter grass, colored coconut, or royal icing grass, using green icing and a #233 decorating tip. To use the tip, start squeezing before you touch the tip down, and keep squeezing as you’re pulling up. Practice first on a piece of waxed paper. Add a rainbow if you like, by “gluing” a piece of multicolored sour licorice strip to the back of the egg with white icing–or pipe your own rainbow using several colors of icing and a round decorating tip. Add a simple scene.
- To decorate an upright egg: Before you begin decorating, hold the egg halves together and judge how much space you have. Decorations may be placed on the bottom of both halves. Make sure the “floor” of the egg comes almost up to the bottom of the hole for best viewing. If necessary, you can fill it in with a little green icing. Add a simple scene.
- Pipe white royal icing around the edge of one of the egg halves and press the two halves firmly together. Wipe any frosting from the outside of the egg. Let it dry several hours (or overnight) before decorating the outside.
- Pipe a decorative design around the seams of the egg and the viewing hole, using a tip that is an appropriate size for the egg. The edging for the large purple egg was made with a big "2D" drop flower tip, pushing backward while squeezing, and then letting off pressure while pulling forward. A #21 open star tip was used for the smaller pink egg, with a motion similar to making a number 9.
- Add flowers, candy, or pipe a name on the outside of the egg. Let it dry thoroughly before moving it.