
Lapbooking is a great way to gather and contain information on a particular subject. You can use lapbooks as a smaller stand alone unit study or use them as a supplement for any curriculum. They are inexpensive, simple to put together, and are easy to adapt to a wide variety of ages and topics, making them a great choice to round out your homeschooling curriculum. File folders can be picked up in packs of 10 or so at Dollar Tree, or sturdier ones can be found at office supply stores. What do you fill them with? Whatever photos, facts, and other information that you can gather on your subject.
Lapbooks are commonly made using manilla office folders. For the cover you can decorate in your theme using: scrapbook paper, stickers, markers, or photographs to represent your theme. For a small one day study, you may find you only need one folder, for larger more in depth studies you can connect two or more together to create a bigger book.
How to Start Lapbooking
To create your lap book you will need:
- File folders
- Glue (sticks are best)
- Stapler/staples
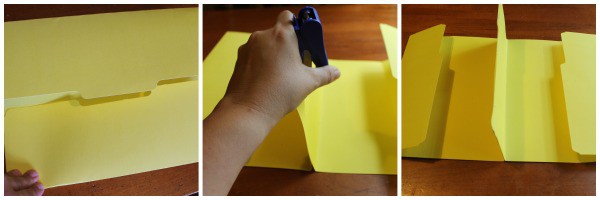
For a small single lapbook you will need only one folder. Open the folder and fold both sides inward so that they meet in the middle at the crease. Press firmly on your newly made creases so that it lays flat. You may choose to put a heavy book on top of it for a while to make it even flatter. For a larger, more involved study you can repeat the process twice and staple the folders together by opening each and pressing the flaps together, securing them with tape or staples, and folding them up to close, as shown below. If we have handwriting practice, do journaling on our subject, or have any other loose papers on the subject, then I just slip it in our lapbook for safe keeping.
There are many free and inexpensive ready-made components for just about any subject available online to print off and build your lap book. Simply search for your subject + lap book on Google or hit up Pinterest and you will surely find a treasure trove of topical information and printables. We have often put together our own by gathering information from books, and doing searches on the internet for printable images. For instance a state study will include a picture of the state, the flag, and various state animals, tree’s,etc. Then either print out a corresponding label or have them write it in. Use the lap book to document a book Report- Choose your favorite book and use your lapbook to gather and display information about the book, the actual report can be stapled right into the lapbook.
To get you started here is a short list of topics we have covered, or are planning to cover using lapbooks.
- State Study
- Bugs
- 10 Commandments
- Fruits of the Spirit
- 4 Food Groups
- Seasons
- Little House on The Prairie
- Sea Life
- Bones of the Body

Leave a Reply