
Do you have excess herbs that you would like to dry? You don’t need a dehydrator; there are a variety of ways you can dry herbs. One of the easiest way to dry herbs is by drying them in a paper bag. This method takes a little longer than other methods, but it is very easy and keeps the cuttings dust free while they are hanging to dry. You can also use this method to catch seeds from your herbs.
How to Dry Herbs in a Paper Bag
1. Cut 3 – 5 stems of the herb you wish to dry. Shake to remove any bugs. Pinch any damage leaves. Wash and thoroughly dry.
2. Make several holes in a paper lunch bag to ensure that air can circulate. Insert the stems into the bag.
3. Wrap a rubber band around the outside of the bag, securing stems. You want the rubber band to be secure, but not so tight that it will dig into the stems.
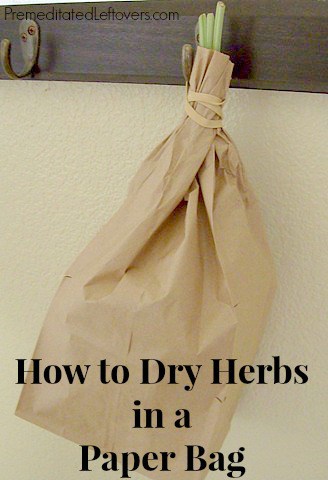
4. Use the rubber band to hang the paper bag from a hook:
5. Check herbs after a week to see if they are dry. If not, check back in another 3 – 5 days until they crumble at the touch.
6. When dry, remove herbs from the bag. Remove the leaves from stems and store in an airtight container. You can store the leaves whole or crumble them first.
It will take 1 – 3 weeks for the herbs to dry, depending on your humidity level. Using a paper bag keeps dust off of the drying herbs and allows you to collect any leaves (or in the case of cilantro, any seeds) that may fall. They are ready once the leaves become crumbly to the touch. I store the dried leaves in an airtight, glass jar and crush as needed for recipes.
Do you dry herbs for use over the winter? Which method do you use?
More Tips for Working with Herbs
- How to Freeze Herbs
- How to Dry Herbs and Flowers
- Tips for Growing an Indoor Herb Garden
- How to Substitute Dried Herbs and Fresh Herbs

Little City Shibas says
I put herbs in an ice cube tray and pour olive oil onto them then freeze and put into a baggie and store in the freezer.
Anonymous says
I just pull the leaves from the stems, partially fill a paper bag with the leaves, shake the bag around every day or so, let them dry and then crush some for use and store other leaves in bags, jars,etc. in freezer.
I keep it as simple as possible!
Just don't make it harder or more complicated than needed.
Barbara says
I agree – I do them the same way as Anonymous – also particularly great with Rosemary and Oregano too!
Sylvie says
I did the paper bag method for my parsley this year and I grew celeriac (celery root) and I’m trying this same method to dry the leave. It takes much longer though as the leaves are bigger and thicker but it’s getting there. I shake the bag every day one or twice. I’m trying it with my rosemary and sage. I like the dust free environment and the simplicity of it. 🙂
MaggieMojo says
Thanks for posting this, I was just thinking about how I should dry my herbs (basil & tarragon) today. This is a very handy tip!
tamilyn says
great idea! I have never dried herbs before-probably because this is the first time I have actually been able to GROW any!
Bette says
oohhh thank-you! Ive been trying to figure out how to dry some of the herbs in my herb pot for the winter.
Melinda says
This is a great idea. I have dried some herbs before, but wound up not using some of them because they were covered with dust. I am drying herbs to give as Christmas gifts this year and I just bought a big package of paper bags. I'm going to start some rosemary today! Thanks for the tip.
BTW I linked here from Tammy's Recipes. This is my first visit.
kissykat says
This is brilliant! I want to plant an extensive herb garden when I get home (living abroad right now), and this is really a GREAT idea! Have you tried drying any fruits without a dehydrator? My children are mad about mangoes for instance, and they are VERY inexpensive to buy here in season, but out of season the dried ones are very pricey and I wanted to try drying myself but I have no idea where to start!
Anonymous says
wow, this is exactly what I needed to know! Thanks!
Brandi says
Great tip! I actually have some basil hanging up to dry without a bag — didn't think about dust!!! Yuck. Have a lot more basil in my garden, so I will have to cover with a bag next time!!!
Racquel says
Thanks for the great tip. I've never dried my own herbs so I'll be bookmarking this post. 🙂
Butterpoweredbike says
I don't like drying herbs in my dehydrator because it gets too hot and I worry that they are actually cooking. I've got a lot of tender summer herbs that I'm wanting to dry in the next few weeks, so thank you for sharing the tip with Two for Tuesday.
Christy says
I love this tip – I have a dehydrator but it is old and often in use for other things – thanks for linking this to Two for Tuesdays!
Kimberly says
I enjoy the brown paper bag method…I live in Arizona tons of dry natural heat. I am able to dry kale..dandelion,spring onions ,cilantro, and of course spinach,. Avocado seeds, my citrus zests and string beans…I use a 2 rinse method..1 large bowl cool water to rinse any dirt or bugs…2 rinse consists of another bowl of water with slice or 2 of lemons…aka vitamin c/natural acidic rinse to preserve coloration…then place in a white zippered mesh laundry for initial drying…the n after droplets of rinse are gone…into the individual brown paper bags they go…and then I hang them on my laundry rack from Ikea secured with the clothespins …of course I poke holes in the bag for aeration… Then I go out daily and check the status of dryness, and shake the bags…kinda like nursing …or babying my harvest.. another thing I’ve noticed about this method is I feel very comfortable with the sanitation…to ensure little less likely hood of cross contaminations….upon evaluation of dryness each bag is dumped into a Ziploc bag dated and labeled according…aka batch….I do feel that its more beneficial to store your batches in a larger brown paper bag in a cooler area of home and away from sunlight for the optimum value of each dried products…..
the clark clan says
Alea, this is really neato! I do have a dehydrator, but you know what? sometimes I find that the dehydrator makes the herbs less potent because it dries out the essential oils too fast! I like this idea and am going to try it with some of my wild foraged herbs in the near future! 🙂 Thanks for linking up with the two for tuesday recipe blog hop! 🙂 Alex@amoderatelife
girlichef says
Very, very cool…love this idea. I often lose leaves when hanging herbs to dry…why did I never think of this, LOL!? I do love hanging dry or freezing (except for basil since it turns black). I just puree a bunch of basil with a bit of olive oil and then freeze it in icecube trays and transfer to freezer bags…that keeps the green =) Thank you for sharing this with Two for Tuesdays!
Alea says
even-star, Do you have a post on freezer drying? I would love to see how you do it!
even-star says
oooh great tip! I definitely put up herbs for the winter but I freeze them rather than dry them. I will try this out on a few batches and see how they turn out!