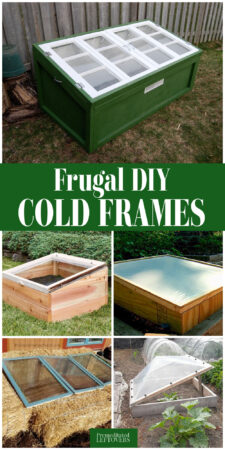
Do you have a short growing season? You can lengthen it with a cold frame. Here are frugal ways to build a cold frame for your garden.

For many of us that live in the cooler temperature regions, we tend to think by this time of year, growing vegetables is hopeless. This is not really true if you make a cold frame. You may not be able to grow the entire winter season, depending on where you live, however, you could go later into the year and start earlier as well. For those that don’t live in the frigid cold, you may even be able to use a cold frame to keep your growing season year-long. Here are some tips for using a cold frame and frugal ways to build a cold frame at home.
Why Use a Cold Frame?
Cold frames extend the growing season significantly.
A cold frame can add 4–8 weeks (or more) of productive gardening time, depending on your climate. Start cool-season crops like lettuce, spinach, kale, radishes, or carrots weeks earlier in spring when there is still a chance of frost or snow. You can also use it to grow vegetables in late fall and throughout the winter.
Enables earlier seed starting and transplanting.
You can sow seeds directly in the frame or start seedlings 2–6 weeks ahead of outdoor planting dates. This jump-starts your garden and gives tender plants (or heat-loving crops like peppers) a head start in a sheltered spot before moving them out.
Protects plants from harsh weather.
The enclosed design shields crops from frost, freezing winds, heavy rain, snow, ice, and sudden temperature swings. Soil and air inside stay noticeably warmer (often 5–10°F or more above outside conditions), helping cold-hardy plants thrive through marginal weather.
Offers natural pest and critter deterrence.
The lid and sides create a physical barrier against many common garden pests—insects, birds, rabbits, mice, and digging animals—resulting in cleaner, less-damaged produce without heavy reliance on sprays or netting.
Serves as an ideal space for hardening off seedlings.
Transition indoor-started plants to outdoor conditions gradually by using the cold frame as an intermediate step. Venting the lid controls temperature and humidity, preventing shock when seedlings finally go into the open garden.
Inexpensive, space-efficient, and beginner-friendly.
Cold frames are affordable to build (often using recycled materials) or buy, require no electricity or heating systems, and fit neatly into small yards, raised beds, or even patios. They deliver big results with minimal effort and maintenance.
Frugal Ways to Build a Cold Frame
You can buy cold frames at nurseries and online, but making one at home can be a very frugal venture and as an added bonus, you are reusing and re-purposing materials that would often end up in landfills to make one. Some common materials uses to make cold frames that can be free or nearly free include:
- Old doors
- Old windows
- Bales of hay or straw
- Pallet boards
You can get many of these materials by simply looking in your local newspaper’s “free” section, on Craigslist and Freecycle, and for low prices at stores that offer used building materials for re-purposing. These are often run by the local Habitat for Humanity chapters in communities and often go by “Home resource” stores.
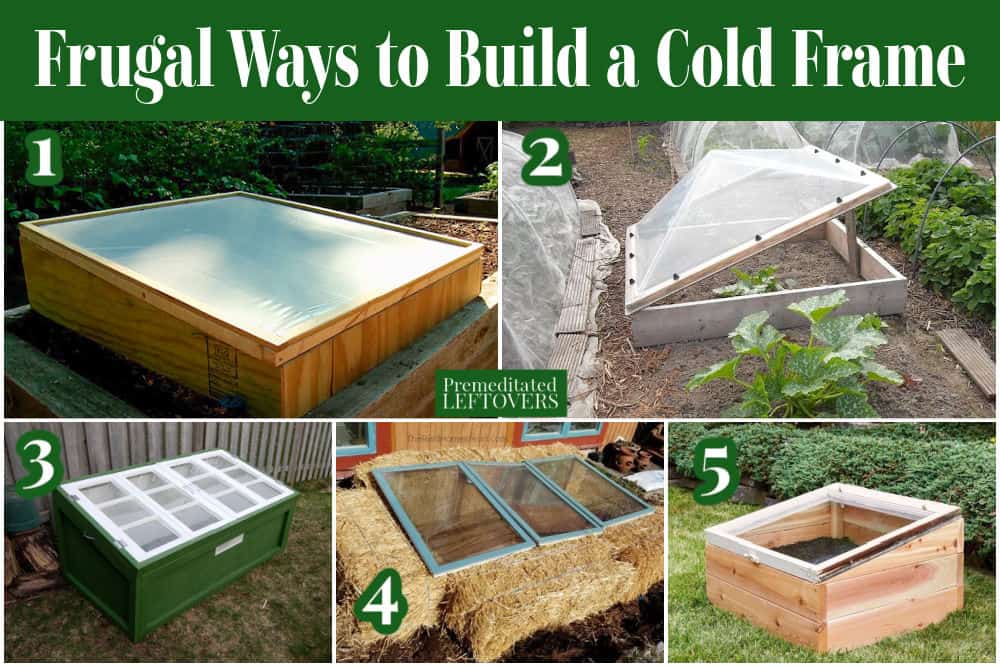
Frugal Ways to Make a Cold Frame
1. Joe Gardener has directions for a Quick and Simple Cold Frame that takes about an hour to build using scrap materials and plastic sheeting. He includes video instructions.
2. The Old Farmer’s Almanac has a step-by-step guide to building a Classic Cold Frame with tips for use in gardening.
3. Jeff on Instructables made a Cold Frame made from old windows with sliding windows and scrap wood. It didn’t take long to build and it look amazing!
4. This straw bale cold frame from The Reid Homestead uses no tools and you can make it in under 30 minutes. No special skills are required.
5. Build a DIY Cold Frame using an old window with detailed step-by-step with photos, cut list, and adjustments for window size from Savvy Gardening.
Don’t have time to build a cold frame? You can always buy a cold frame. If you don’t have scrap wood or old windows buying but a cold frame may be less expensive, but it will still require some assembly.
You don’t always need a cold frame, just protection from the elements. A frost cloth row cover such as this Row Cover Garden Hoops will protect your plants.
You can also use a Portable Green House Greenhouse to protect your plants from frost and snow.
No matter which cold frame you choose, make sure to do your research on what kinds of plants grow best in your area for cold frame gardening before you start. Happy gardening!
Tips for Using a Cold Frame
Make sure your location for placing your cold frame is ideal. This often means south-facing in an area that gets a good amount of sun and can be protected from harsh winds.
Don’t let it get too hot. This may seem like a strange piece of advice, but you don’t want to let your cold frame get too toasty and since you are essentially creating a small form of a large greenhouse, this can actually happen. Allowing it to get too hot inside could potentially kill your seedlings or your vegetables that are meant for the cooler weather growing season. If the temperature gets above 40-45 degrees outside, allow your lid to prop up on your cold frame during the day to allow it to stay at the ideal temperature. Make sure to close the lid when the sun goes down!
Don’t let it get too cold. Cold-frame gardening is kind of tedious, but well worth it. If the nights are getting very cold, make sure to insulate them at night. It doesn’t matter if you cover it completely as there is no vital sun you are missing at dark, but make sure you uncover early enough in the day to get the sun to your plants. You can insulate with old blankets, leaves, and even snow, but don’t use something too heavy as you wouldn’t want to break your glass.
Keep your glass clean. Make sure your glass stays relatively clean as the clearer it is, the better direct son your plants will get.
More Frugal Gardening Tips
- 5 Frugal Ways to Start Seeds Indoors
- Frugal Gardening Tips: How to Start a Garden on a Budget
- How to Save Money at Greenhouses and Gardening Centers
- How to Save Money by Growing Perennials
- How to Garden for {Nearly} Free
More Cold Weather Gardening Tips
- DIY Bamboo Greenhouse
- Tips for Winter Composting
- Fall Vegetable Gardening Guide
- Winter Vegetable Gardening Guide

Mary says
I lucked out I guess. 5 sets of sliding patio doors and later 5 doors with mostly double pane glass . my cold frames were simple cinder block dry stacked 2 or 3 rows high. 2 short lengths of rebar as a door stop so I could raise one side of the heavy door to water or cool the hot bed. Some days they could have cooked plants rather than warm them. I kept a thermometer and a stick inside. The stick could hold the door up to ventilated the inside on sunny days.
Donna says
Love the ideas. Old windows or doors can be bought at salvage yards. Reuse, recycle.
Margaret Gaughan Upton, AIA says
I am concerned with people using old windows and doors since they likely contain lead based paint.
magnoliasouth says
Not everyone has the resources to get obtain windows and doors. I see this advice a lot but I’ve never been able to run across anyone with those to spare. It’s like all the dog beds using antique luggage. Few of us have antique luggage sitting around and once it’s posted antique dealers increase the price of that stuff.
I mean, I appreciate the idea behind it, but it’s only for very lucky people with extended resources.
Jen says
I lucked out and found old windows for $6 each at my local Habitat for Humanity Restore.
RJ says
I’ve read up on this in the past and you are supposed to seal it in with safe paint (I think exterior latex). Once you do that, it should be fine.