If you love the cottage garden look, you know that you can’t have it without window boxes. Window boxes are the perfect addition, as they offer so much beauty and charm as they overflow with colorful flowers and greenery. Perhaps your neighbors have window boxes, and you have walked by their home turning green with envy. Well you don’t need to be envious any longer! Instead, spend a weekend and build your own! Building your own window boxes are easier than you might think, and you don’t need to be Bob the Builder or a master gardening in order to build and maintain one. If a window box has been something you have dreamed of, take a look at how easy it is to make that dream a reality.
How to Build a Window Box
Firs, let’s take a look at the supplies you will need. Most of these items can be found at your local home improvement store.
Supplies:
1- by 8-inch pressure treated wood boards. These hold up well in the weather and can still be purchased at a reasonable cost.
Power saw
Drill and coordinating drill bits
Exterior paint or stain in your choice of color
Medium grade sandpaper
A standard tape measure
Wood glue
Pair of clamps
2 ½-inch galvanized screws
Directions:
The size of boards you use is equivalent to the size of your window. So you will want to measure your window first to decide what size your box will be.
1. First, you want to cut the two pieces of wood the same length. One will be for the back and one will be for the front of the box.
2. Next, cut two pieces that will serve you as the ends of the box. Typically, these are about 4 inches in size.
3. Now you will cut a long piece of wood to make the bottom of the box. This piece should be about 3 inches longer than the front and back pieces.
4. Using a drill bit, make two holes. One will be near the end of the front, and the second will be at the end of the back pieces. Using a drill bit makes the job easier, trust me!
5. Drill two more holes. You will be drilling one at each end of your bottom piece.
6. Tired of drilling yet? Now you want to drill four holes along the length of the bottom piece of your box. These holes are very important since they are going to serve as drainage holes for your plants. You don’t want your box to retain water since it will drown your plants and could possibly pull your box off.
7. Take your wood glue and using long thick strips, glue the front and back pieces to the ends. You can use your clamps to clamp them together firmly. Once secure you can add your screws to hold it all together.
8. Glue the bottom piece to the sides and then ends and screw into place.
9. Take medium grade sandpaper and gently sand the box removing any glue or flaws. Finish with a paint or stain of your choice.
Once your box is completed, there will be a variety of ways to hang it from your window. This will all depend on what your window trim and siding is made out of. Chances are, some heavy duty screws and brackets will do the job. Your local home improvement store can make suggestions on what will hold up best.
Before planting, line your box with plastic lining that has drainage holes. This will protect the box and serve your plants well. Each year, you may wish to apply a clear coat to protect the wood as well as the paint or stain. It will keep the box looking clean and fresh.
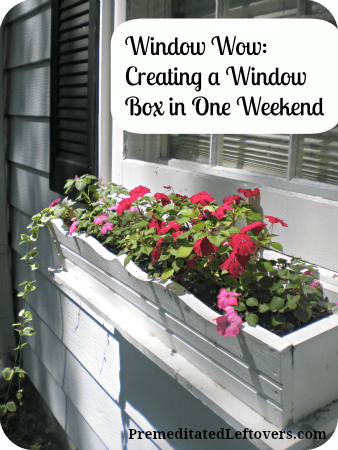
Choose plants that don’t need too much depth or sun. Flowers such as begonias or impatiens are ideal for planter boxes! They love the small space and won’t mind the shade that the house might cast on them.
In one weekend, you can have window boxes that you can be proud of. As you can see it does not take a great deal of time or supplies to get you up and running. You will enjoy planting in these beauties each spring and enjoying the cascading flowers all summer. Good luck!
Katie Femia is a wife and mother of three. She loves vintage finds, handmade goodness, the frugal life, and the long road to publication. You can find her at The Savvy Luna Bugg, the blog for frugalistas seeking simplicity through a handmade and vintage lifestyle.

Leave a Reply