• Home
  • About
    • Privacy Policy
  • Blog
  • Prep-Ahead Meals Cookbooks
  • Recipes
  • Lifestyle
  • Gardening
  • Kid’s Activities
  • Gluten-Free Recipes
  • Budgeting Tips
↑

Premeditated Leftovers™

Prep-Ahead Meals, Cooking Tips, and Frugal Living

  • Cookbooks
    • Prep-Ahead Breakfasts and Lunches
    • Prep-Ahead Meals From Scratch
  • Recipe Index
  • Members Area
    • Member Login
    • Join Us
  • Home
  • Blog
  • Recipes
  • Gluten-Free Recipes
  • Lifestyle
  • Garden
  • DIY
  • Kids
  • Budget

You are here: Home / Gardening / How to Make a Frugal Cloche

How to Make a Frugal Cloche

March 20, 2013 by Alea Milham 6 Comments

This post may contain affiliate links. Read our disclosure policy here.
294 shares
  • Share
  • Tweet

I am always anxious to start gardening. The general rule of thumb is plant cold-hardy vegetables 4 – 6 weeks before the last frost, but I just can’t wait that long! Our last frost isn’t until mid June!  Since I am impatient, I have come up with several different ways to create frugal cloches for my vegetable garden.

Use a milk jug and juice container as a cloche

The easiest way to create a cloche is to cut the bottom off of a milk jug or juice container. Since they come with lids, you can easily remove the cap during the day to allow air to circulate and place the lid back on at night to protect the plants.

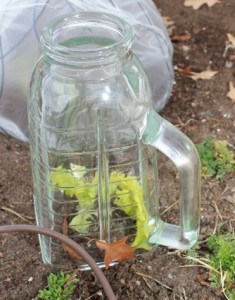
Use a blender as a cloche (334x425)

Glass hurricane lamps and blenders make great cloches for taller veggies. You just need to cover the top with plastic during the evening.
You can also use the blender attachment as a top on the inverted blender to help hold heat in through the night.
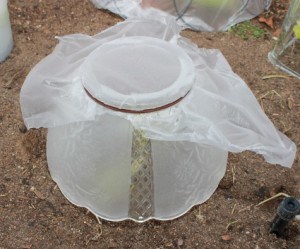
Use a light fixture as a cloche

Old light fixtures can be used as cloches for shorter plants. Again, you need to cover the top with plastic when the sun sets. You can use a rubber band or hair tie to secure the plastic.

Invert a hanging basket, cover with plastic and use as a cloche

In early spring I cover my hanging basket with plastic and turn them upside down over plants to create a temporary, makeshift cloche. I usually use a piece a plastic tarp to cover the basket. When I don’t have  any plastic tarp, I just grab some plastic wrap from the kitchen. Secure the plastic with packaging tape.

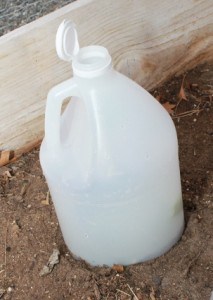
Use a vinegar jug as a cloche

Vinegar jugs are my favorite item to turn into a cloche. They have a lid, so I don’t have to make one, and the lid is attached, so I don’t have to worry about storing it when I’m not using it.

DIY Frugal Cloche  Ideas

My cloche hodgepodge may look funny, but it keeps my semi-hardy plants alive through hard frosts. And when we experience a big temperature drop and I need to protect lots of plants at once, I will use plastic drop cloths to create temporary cold frames.

More Frugal Gardening Tips:

How to Make Raised Garden Beds
How to Extend a Short Growing Season
How to Make a Planter Out of a Tree Stump
How to Make a Mini-Greenhouse with Recycled Items
How to Make Fast and Easy Compost Pile Using Hay Bales
How to Extend Your Growing Season with a Container Garden
How to Get More from Your Square Foot Garden with Succession Planting
294 shares
  • Share
  • Tweet

About Alea Milham

Alea Milham is the owner of Premeditated Leftovers and the author of Prep-Ahead Meals from Scatch. She shares her tips for saving money and time while reducing waste in her home. Her favorite hobby, gardening, is a frugal source of organic produce for her recipes. She believes it is possible to live fully and eat well while spending less.

Comments

  1. Nathalie says

    April 13, 2018 at 3:45 pm

    so very inspiring. truly resourceful you are! Bless you!!!

    Reply
  2. bren says

    July 31, 2013 at 8:10 pm

    For taller plants I use Tall/slender wooden fruit baskets and for lots of plants like green beans or potatoes (where there is a late frost) I used straw this year. Everything was saved… (an old sheet works too for larger beds).

    Reply
  3. Michele Bloomquist says

    March 29, 2013 at 12:58 pm

    Great ideas Alea — thanks so much for sharing. Reduce, reuse, recycle. Love it! Like you, I can never resist jumping into gardening at the first sight of spring!

    Reply
  4. Alison says

    March 21, 2013 at 8:14 am

    I use plastic jugs as cloches too, but without landscape staples to hold them in place, they would blow away in the wind.

    Reply
    • Alea Milham says

      March 22, 2013 at 1:30 pm

      Good point! when it is windy, I use tent stakes to hold down the light weight cloches.

      Reply
  5. Shirley @ gfe & All Gluten-Free Desserts says

    March 20, 2013 at 3:12 pm

    Neat ideas, Alea! There are some here that I’ve never seen but it makes sense touse everything at one’s disposal. 🙂

    Shirley

    Reply

Leave a Reply Cancel reply

Your email address will not be published. Required fields are marked *

Recipe Rating


Search

Prep-Ahead Breakfasts and Lunches by Alea Milham

Recent Articles:

How to Start Your First Garden

2 ways to start composting easily

3 Ways to Start Composting

How to attract wild birds to your yard.

Tips for Attracting Winter Birds

Prep-Ahead Meals from Scratch Where to Buy

BROWSE:

  • Blog
  • Cookbooks
  • Recipe Index
  • Members Area

ABOUT:

  • About
  • Contact
  • Privacy Policy
  • Disclosure

Welcome. I'm Alea!

On Premeditated Leftovers I share simple recipes made with whole foods, practical shopping tips, time saving techniques, and meal planning strategies. I also share tips for minimizing food waste, so more of the food that is purchased ends up on the table.

While volunteering as a budget counselor, I realized that food is the element of most people’s budgets where they have the greatest control. I set out to develop low-cost recipes from scratch to prove it’s possible to create delicious meals on a limited budget. Eating well while spending less is about more than just creating recipes using inexpensive ingredients; it’s about creatively combining ingredients so you don’t feel deprived and are inspired to stick to your budget.

Copyright ©2025, Premeditated Leftovers™. All Rights Reserved.
Design by Pixel Me Designs