
One of my favorite activities to do with my little girl is to create fairy gardens, furniture, and accessories. I can relive all the wonder and magic of believing in fairies through her eyes and it is a welcome respite from bills and other responsibilities!
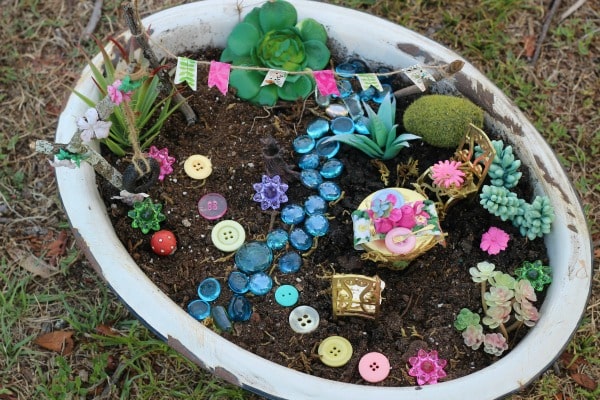
We have made fairy gardens in pots, within our big garden on the ground, in wheelbarrows, bird baths, glass jars, bubble gum machines, and a few other places. If you have ever looked it up you know that those cute little pieces can add up and a fairy garden can become quite expensive in no time- this is why I am always trying to come up with ways to keep the magic without the price tag. This time we used one of the old enamelware tubs in my garden to create a tiny and precious Tea Party Fairy Garden. I spent about $7 from the dollar store and used a few things I had to create this fun fairy arrangement.
I hit the dollar store looking for cheap plastic doll house furniture. I have seen it before and knew it would be perfect for our garden. I was in luck, a whole package for $1 included a doll, table, chairs, tea pot, vase, and silverware. With a little bit of creativity and a few found items we went to work making a tea party themed garden that any fairy would love to rest and enjoy a light refreshment in. I made two main decorative items for this and the rest was just a matter of arranging objects.
Tea Party Fairy Garden
Materials:
- package of plastic doll furniture
- gold spray paint
- pink spray paint
- faux moss
- scrap piece of fabric
- small silk flowers
- 2 buttons
- craft glue
Directions:
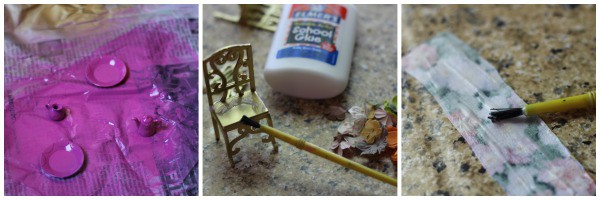
- The first thing I did was remove the plates from the package of furniture I bought. I decided not to use them since the scale was so large for the table. Then, I gave the table, chairs, and utensils a light coat of gold spray paint. Allow to dry, then apply another coat until nicely covered.
- Then, I covered the vase and tea pot with a pretty bright pink spray paint I had on hand.
- Once the paint is completely dry, add little bits of moss and silk flowers and secure them with craft glue. You can use hot glue if you wish but I opted not to so that my little one could help and also so the heat did not damage the table. Adding the moss and flowers make it seem as if you happened upon this little set in the middle of a clearing in a fairy glen. I love the mix of the gold with the natural elements.
- Next, I raided my craft stash for a strip of fabric to create a runner and 2 larger buttons with edges for plates. Apply glue to the back of the runner and plates to secure them to the table if you wish.

- I slid a few silk flowers in the vase and glued them in. ThenI attached the vase and tea pot to table as well to finish it off.
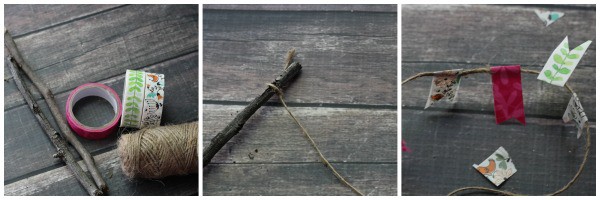
The next thing I did was create a simple bunting banner. It’s very easy and adds a sweet touch to your garden.
Fairy Garden Bunting
Materials:
- 2 sticks
- twine
- 2-3 different washi tape designs
- scissors
Directions:
- Tie twine between two sticks, about 6″-8″ apart. You want your sticks to sit deep enough in your soil that they will be secure and tall enough to create a good banner.
- Fold your washi tape over twine and trim with scissors to create a pennant shape.

For the rest of garden I used 5 faux succulents to decorate further. I also created a little stream right through the garden with blue glass beads from the dollar store and made a little path of stepping stones from buttons in my craft stash. Get creative and have fun with your fairy garden. Don’t be afraid to let your little one take the lead. I recommend that this garden be used indoors or on a covered porch due to the materials used.
More Fairy Gardens:
How to Create a Magical Fairy Garden
How to Create a Pirate Grotto Fairy Garden in a Wagon

Shirley Wood says
Fairy Gardens are such fun! Thanks for sharing with us at Merry Monday.
Lady Lilith says
This is such a cute idea. I love the way it can add some personalty to a garden.
Laurie says
Super cute! I would love to make something similar with my granddaughter — she loves tea parties. And lots of fun for little money 🙂 I especially love the bunting idea! Thanks for the inspiration.
Debbie says
This is so cute! I especially like the washi tape bunting. What a clever idea.