I really think it was easier last year when I was on The compact and not buying anything new. I didn’t have to worry about comparison shopping to find the best deal – if Goodwill had it I did a little happy dance and if not, I did without. I also didn’t have to worry about where it was produced. Buying a secondhand item, even if it comes from China, is still a more environmentally friendly choice than buying a new item.
This year we are striving to be conscientious consumers and will occasionally buy new items. This is turning out to be a lot of work. After my first shopping experience which was also my first shopping failure, I was ready to go back on The Compact.
The first thing I wanted to buy this year was Pilates or yoga socks which have non-slip bottoms. I searched for the best prices and looked for socks made in America. After finding a pair that I thought met my requirements, I was distracted by a pair that were white and a little less expensive. I clicked and ordered 3 pair thinking they were a white version of the pair I had researched.
I was so excited when they came. I ripped into a package to try them on and I couldn’t find the non-stick bottoms. Ugh. I looked at the package trying to figure out what went wrong and then I saw Made in China printed on the bottom of the package. Double Ugh. I looked at my receipt and noticed that I could only return unopened items. Triple Ugh. At least I can return the two pair I hadn’t opened but I was disappointed at being stuck with a pair of socks that I didn’t like and couldn’t use.
Then I remembered how I used to use puff paint to make non-slip socks for my kids when they were little and decided to give it a try so I could perhaps partially rectify the situation.
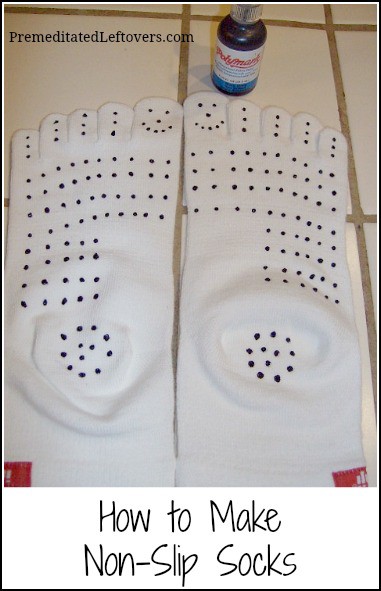
How to Make Non-Slip Socks
Items needed:
- Socks
- Puff Paint
Directions:
Place paper down to protect your the surface you are working on.
Make dots all over the bottom of the socks with puff paint. (Smiley faces on the big toes of your socks are entirely optional.)
Allowed the paint to dry for at least 8 hours before wearing them.
My instructor laughed at the smiley faces peaking over the reformer bar at her and asked where I got them. I told her I made them myself with puff paint and she said, “so I could turn any pair of socks into Pilates socks?” Exactly!

Rebecca Elizabeth Parsons says
OKAY! I have a drawer full of puff paint. Non slip socks for me!!
Angie says
How well do they wash? Gentle cycle, cold wash and no softener?? Do the stickies fall off?? I have LOTS of socks I would love to make a pair for yoga instead of spending money on new ones!!
Alea Milham says
I wash mine n cold water – no softener and I haven’t had the stickies come off.
Amber says
I am gonna use this to make a baby gift for a friend
Jackie @ Crest Cottage Creations says
Too cute! What a great idea! This is actually the second great idea I heard of yours today. The first was the asthma tip over at A Moderate Life. I have suffered from asthma my whole life and since moving into our own house, have kept the hamper in our room. I am moving it as soon as I go upstairs and I can't wait to see the difference! Thanks!
Elsa says
haha! This is a great idea. I will try this with my toddler. We get almost all of her clothes from my brother. He has a daughter about 1 year or so older than mine. When we get the jammies, sometimes the little non-slip things are worn off. This means my daughter occasionally goes sliding through the kitchen. hehe
tamilyn says
great idea, and what perfect rows you have-mine would look like blobs all over 🙂
Shana says
That is too cool. I wish I would have known this when Blaze was smaller!! Love the smiley faces too.
vickie says
what a great idea!
so smart!