• Home
  • About
    • Privacy Policy
  • Blog
  • Prep-Ahead Meals Cookbooks
  • Recipes
  • Lifestyle
  • Gardening
  • Kid’s Activities
  • Gluten-Free Recipes
  • Budgeting Tips
↑

Premeditated Leftovers™

Prep-Ahead Meals, Cooking Tips, and Frugal Living

  • Cookbooks
    • Prep-Ahead Breakfasts and Lunches
    • Prep-Ahead Meals From Scratch
  • Recipe Index
  • Home
  • Blog
  • Recipes
  • Gluten-Free Recipes
  • Lifestyle
  • Garden
  • DIY
  • Kids
  • Budget

You are here: Home / Naturally Frugal Living / The Old Rugged Cross String Art Craft

The Old Rugged Cross String Art Craft

February 18, 2015 by Jody Leave a Comment

This post may contain affiliate links. Read our disclosure policy here.
109 shares
  • Share
  • Tweet

This simple cross string art craft takes just a few minutes to make, and is a kid friendly project using a few common craft supplies.

This simple art piece is a great project to do together with your kids. Inexpensive supplies make a strong statement in your home when put together this way, during the creation and gracing the walls as well.  There were lessons in the creating as we went along, and a reminder of our faith hanging on the wall that all hands had a part in. This turned out to be a very special art piece for us. I have seen string art with wood, nails, and yarn, but I wanted something a little more kid friendly and use common supplies that are on hand in our craft cabinet. I chose the rough sisal twine because I wanted my finished product to be a rustic, rugged cross. Try making one with your children, adding in a bit of devotions and even prayer as you craft this cross string art piece.

 Old Rugged Cross String Art Craft

Supplies Needed:

  • 8 x 10 Canvas frame
  • Twine or sisal string
  • 8 clear tacks
  • Red grosgrain ribon
  • Burlap ribbon
  • Hot glue gun/sticks

Directions:

Measure and mark 2 1/2″ from the  corners on the top and bottom of your canvas frame.

Measure and mark 2 1/2″ down from the corner on each side, and 4″ up from bottom.

Press a clear tack all the way into the wood frame of your canvas at each of your marks.

To begin stringing, hot glue the end of the string to the back of the frame near the bottom left tack. Allow to cool and harden completely.

Run string from behind the bottom left tack across the canvas to the top right tack.

Then run the string from across to the top left tack and across the canvas to the bottom right.

step 1 string art cross

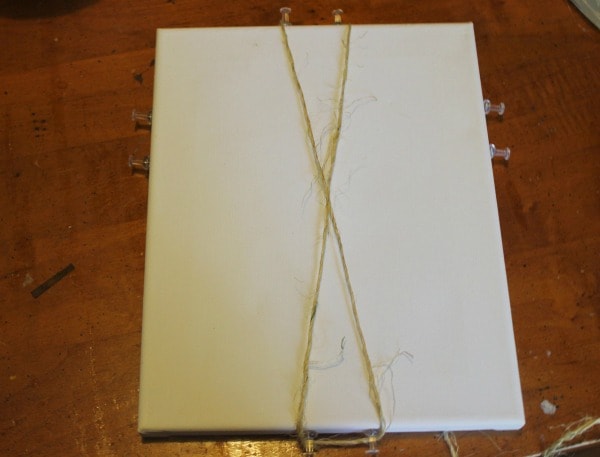
Continue this repeatedly to create an X until the tacks are pretty much covered in the string. Use your fingers to spread and smooth the string a bit until it looks good to you.

Hot glue the end of the string to the back of your canvas

Now for the other piece of the cross you are going to do the same thing, but across horizontally. String from the bottom left tack across the canvas to the top right tack, around the bottom right, and across to top left. Repeat until tacks are full.

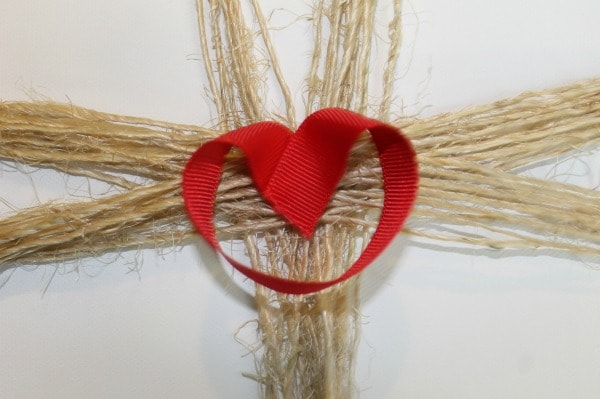
Cut a 4″ length of ribbon, fold the ends over each other to create a “V”, secure with hot glue.

Glue heart to the  center of your Cross forming it into a heart shape.

string heart close up

Use scissors to trim excessive string from your twine to clean up your cross a bit.

Hot glue a length of burlap ribbon to the back center of frame for a hanger.

Cross string art project

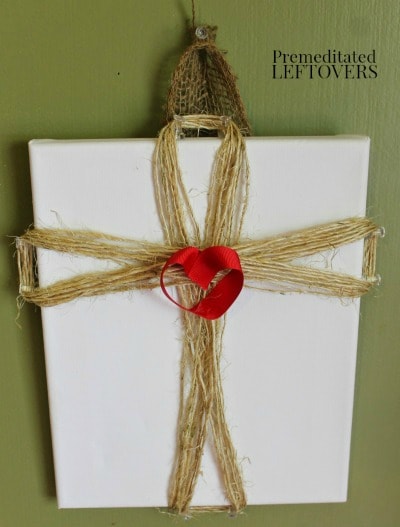
I really love the simplicity of the color, but the impact this piece makes.

Would you like to save this article?

We'll email this post to you, so you can come back to it later!

109 shares
  • Share
  • Tweet

Leave a Reply Cancel reply

Your email address will not be published. Required fields are marked *

Recipe Rating


Search

Recent Articles:

Spring Cleaning Checklists Room by Room Cleaning Tips

Spring Cleaning Checklists Room by Room Cleaning Tips

Tips for Organizing Your Home for Spring Cleaning

Tips for Organizing Your Home for Spring Cleaning

Tips for Decluttering Your House for Spring Cleaning

Tips for Decluttering Your House for Spring Cleaning

BROWSE:

  • Blog
  • Cookbooks
  • Recipe Index

ABOUT:

  • About
  • Contact
  • Privacy Policy
  • Disclosure

Welcome. I'm Alea!

On Premeditated Leftovers I share simple recipes made with whole foods, practical shopping tips, time saving techniques, and meal planning strategies. I also share tips for minimizing food waste, so more of the food that is purchased ends up on the table.

While volunteering as a budget counselor, I realized that food is the element of most people’s budgets where they have the greatest control. I set out to develop low-cost recipes from scratch to prove it’s possible to create delicious meals on a limited budget. Eating well while spending less is about more than just creating recipes using inexpensive ingredients; it’s about creatively combining ingredients so you don’t feel deprived and are inspired to stick to your budget.

Copyright ©2026, Premeditated Leftovers™. All Rights Reserved.
Design by Pixel Me Designs

Share anywhere