• Home
  • About
    • Privacy Policy
  • Blog
  • Prep-Ahead Meals Cookbooks
  • Recipes
  • Lifestyle
  • Gardening
  • Kid’s Activities
  • Gluten-Free Recipes
  • Budgeting Tips
↑

Premeditated Leftovers™

Prep-Ahead Meals, Cooking Tips, and Frugal Living

  • Cookbooks
    • Prep-Ahead Breakfasts and Lunches
    • Prep-Ahead Meals From Scratch
  • Recipe Index
  • Home
  • Blog
  • Recipes
  • Gluten-Free Recipes
  • Lifestyle
  • Garden
  • DIY
  • Kids
  • Budget

You are here: Home / Naturally Frugal Living / How to Make an Indoor Herb Planter from a Mail Sorter

How to Make an Indoor Herb Planter from a Mail Sorter

September 5, 2014 by Katie Femia Leave a Comment

This post may contain affiliate links. Read our disclosure policy here.
143 shares
  • Share
  • Tweet

Easy Indoor Herb Planter

It seems as though bulky wooden mail sorters can be found just about at any thrift store or garage sale. These mail sorters are great at doing their job, but usually aren’t the most appealing to look at. Should you come across one, why not upcycle into something fresh instead? Take a look at how in a few easy steps, we upcycled an old mail sorter into a fully functional indoor herb planter. Just in time too, as you will want to start growing those herbs indoor as the fall season approaches!

How to Make an Indoor Herb Planter from a Mail Sorter

Supplies Needed:
Multi slot mail holder. Wood or even metal will do. Here is what ours looked like before. It was a steal at just $2.

Items needed to make a herb planter from an old mail sorter

You will also need a paint of your choice, as well as a paintbrush.

items needed to make an herb planter

Last but not least, you will need some gravel, potting soil, and herb plants.

Directions:

1. Begin by applying two coats of paint to the wood or metal. We simply brushed ours on, allowing it to dry well between coats.
2. Once the paint is dry, put about an inch of small sand or gravel on the inside of each compartment. This will help the soil in each compartment drain as you water.
3. Top the sand or gravel with soil. Fill to the top of each compartment.
4. You can now plant your herb plants. Dig a hole with a spoon and insert the root of the plant. Cover it well with soil.

Simply hang the indoor herb garden in a sunny location where it will stay nice and warm. Near a window is perfect. To care for your herb plant, mist it regularly with a spray bottle. You do not want to pour water directly into the compartments. Instead, just keep a mister nearby and squirt every few days at the base of the plant.

herb4

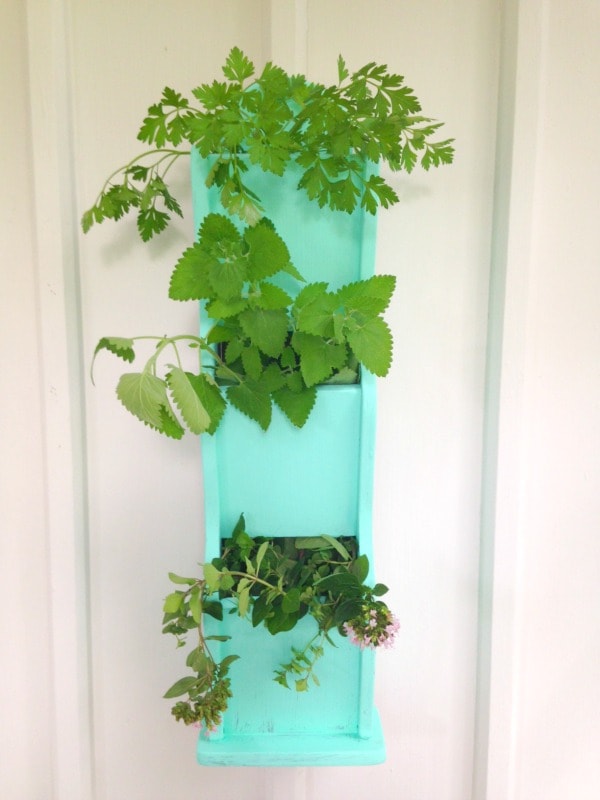
As long as your soil stays damp and the plants get sun, your indoor herb garden can grow all season long. How fun will it be to be able to pick herbs right from your own indoor garden?

Give this simple mail sorter upcycle a try and craft your own indoor herb garden. It is a great way to enjoy fresh herbs all year long.

More Herb Gardening Tips:

  • How to Start an Herb Garden
  • How to Dry Herbs (3 methods)
  • Tips for Growing an Indoor Herb Garden
  • Upcycled Soup Can Herb Planter
  • DIY Herb Pots with Plant Markers
  • DIY Hanging Colander Herb Planter

Would you like to save this article?

We'll email this post to you, so you can come back to it later!

143 shares
  • Share
  • Tweet

Leave a Reply Cancel reply

Your email address will not be published. Required fields are marked *

Recipe Rating


Search

Recent Articles:

Spring Cleaning Checklists Room by Room Cleaning Tips

Spring Cleaning Checklists Room by Room Cleaning Tips

Tips for Organizing Your Home for Spring Cleaning

Tips for Organizing Your Home for Spring Cleaning

Tips for Decluttering Your House for Spring Cleaning

Tips for Decluttering Your House for Spring Cleaning

BROWSE:

  • Blog
  • Cookbooks
  • Recipe Index

ABOUT:

  • About
  • Contact
  • Privacy Policy
  • Disclosure

Welcome. I'm Alea!

On Premeditated Leftovers I share simple recipes made with whole foods, practical shopping tips, time saving techniques, and meal planning strategies. I also share tips for minimizing food waste, so more of the food that is purchased ends up on the table.

While volunteering as a budget counselor, I realized that food is the element of most people’s budgets where they have the greatest control. I set out to develop low-cost recipes from scratch to prove it’s possible to create delicious meals on a limited budget. Eating well while spending less is about more than just creating recipes using inexpensive ingredients; it’s about creatively combining ingredients so you don’t feel deprived and are inspired to stick to your budget.

Copyright ©2026, Premeditated Leftovers™. All Rights Reserved.
Design by Pixel Me Designs

Share anywhere