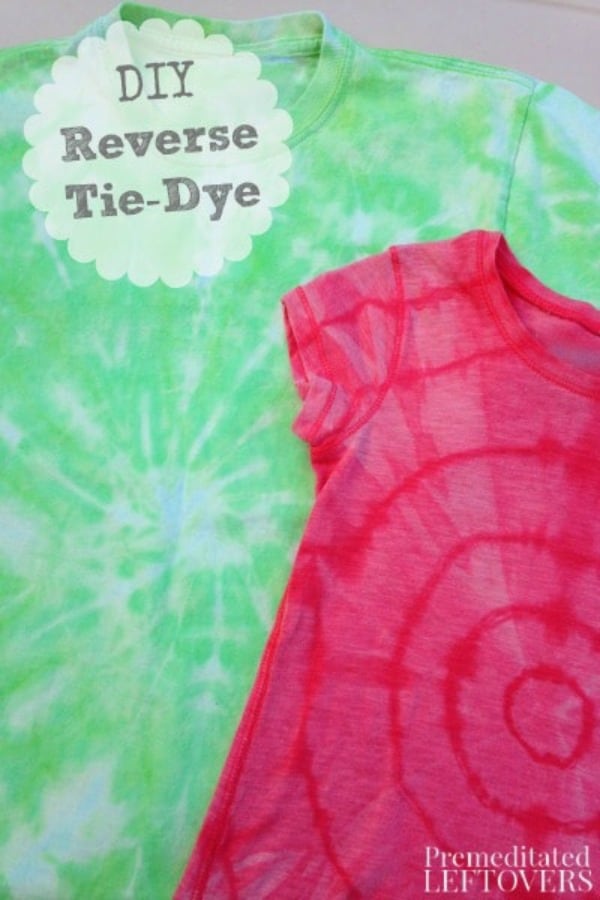
Instead of tie-dyeing a shirt, you can use bleach to reverse tie-dye a t-shirt.
I’m starting to see tie-dye popping up in stores more and more. It seems to be another one of those old trends making its way around again just in time for summer. Tie-dyeing is a fun activity to do right at home and is also a frugal way to upcycle clothing or just about any other fabric.
You may be familiar with the standard tie-dye technique that uses liquid dyes either applied directly to your fabric or used in a bucket for dipping. There’s also one more technique that I discovered recently that achieves the same cool designs without the need for dyes.
All you need to reverse tie-dye is water and liquid bleach. Instead of applying dyes to a plain white fabric, you start with a solid color and alter the already existing dye applied by the manufacturer. This technique is really easy and affordable as you may be able to find everything you need already lying around your home. Solid color t-shirts are usually well under a dollar at thrift stores, so go grab a few and give this fun activity a try.
How to Reverse Tie Dye a T-Shirt
Materials:
- 2 cups liquid bleach
- 2 gallons of water
- 2-3 solid colored t-shirts
- 1 bucket
- Rubber gloves
- Rubber bands
Instructions for tie technique #1:
1. Lay your fabric on a flat surface.
2. Use your fingers to pull up the fabric from the middle, and allow the rest to fall to the sides.
3. Apply rubber bands securely starting from the tip of the fabric and working your way down.
Instructions for tie technique #2:
1. Lay your fabric on a flat surface.
.2 Use your hands to grab the fabric from the middle and turn counter-clockwise.
3. Continue turning the fabric until it is wound tightly into itself.
4. Keeping your fabric wound tightly, apply rubber bands to resemble a web.
Instructions for dyeing:
1. Fill a bucket with 2 gallons of water.
2. Carefully mix in the 2 cups of bleach.
3. Using rubber gloves, submerge your tied fabric in the water.
4. Check your fabric in 1 hour intervals. Some fabrics may fade faster than others but be careful with this. Bleach is strong and works quickly. My shirts were good to go after 1 hour.
5. When you’re ready to remove the fabrics, give them a good squeeze to drain any additional water.
6. Rinse them well under cold water.
7. Wash your new reverse tie-dyes by themselves according to your regular wash routine prior to wearing.
My kids enjoyed picking out their own shirts for this activity, but aside from that I completed this one on my own. Bleach is nothing to mess around with, so reverse tie-dyeing is best left to adults or even teenagers given the right amount of supervision.


Vivian says
Awesome I had bought a hoodie and the lady who made it she said she went to thrift stores and yard sales with spots on them she just tie-dyed them. I had to tie dye my other hoodie that was printed on it saying proud Navy mom well washed it at a friends house and it got a big stain on the back so I went and tie dyed it too.
Ntina says
I was looking for a way to tie-dye a tshirt because I see the trend coming back too! (and it’s cute) I love your ideas and they seem really easy to make. I’m going to give it a try! Thank you! Found you at a linky!
Mary Gilbert says
Shared! Thanks for posting on Moonlight & Mason Jars
Nina Lewis says
I’m dropping by from Treasure Box Tuesday link party. I absolutely LOVE this idea!! In fact, I think I like it better than the regular tie dying. I’m thinking of all of the shirts that I have in my closet that I can do this to! My kids tease me that bleach is my ‘power tool’ (like my husband’s Shopsmith is his power tool…). Now I’ve got a really great reason to use it!
I have a link party that I am trying to grow. I invite you to share this idea (and a couple of others) at my Grandma Ideas Sharing Time link up at http://grandmaideas.com. I think my readers would LOVE this idea, too.
My linkup is open Wednesday through Friday at midnight. I hope to see you there!
All the best,
Nina