


These Felt Christmas Cookies are an adorable craft for pretend play or to hang on your Christmas tree. Kids will enjoy decorating each colorful cookie just like the real thing, but without the mess!

Decorating Christmas cookies is one of my very favorite holiday activities, but the truth is, it can get pretty messy! On top of being messy, it can take some time to make the cookies, cool them, and get out the frosting and decorations to make your cookies look good. Plus, if you are trying to do this with small children, you can count on the mess being twice as big. That’s where these fun Felt Christmas Cookies come into play, literally! With this fun felt DIY Christmas play set, you can let them decorate cookies for Christmas all afternoon. After making the cookies your kids can decide if they are going to become a permanent part of their play kitchen or if they are going to be used as Christmas decorations.
Felt Christmas Cookies Craft Tutorial
While young children will love using these as Christmas cookies in the imaginative play, older kids will enjoy using these cookies to make lovely Christmas Tree Ornaments or a festive Christmas Garland.
Materials Needed:
- 2 sheets light brown felt
- 1 each multi-colored felt pieces. I used white, red, green, light blue and yellow
- Christmas cookies cutters
- pencil
- sharp scissors
- puffy paint for Christmas tree ‘lights’ (optional but super cute)


Felt Cookie Christmas Ornaments
Felt Christmas Cookie Garland
Printable Directions for Making Felt Christmas Cookies

Felt Christmas Cookies Craft Tutorial
Equipment
- 2 sheets light brown felt
- 1 each multi-colored felt pieces. I used white, red, green, light blue and yellow
- Christmas cookies cutters
- pencil
- sharp scissors
- puffy paint for Christmas tree 'lights' (optional but super cute)
Instructions
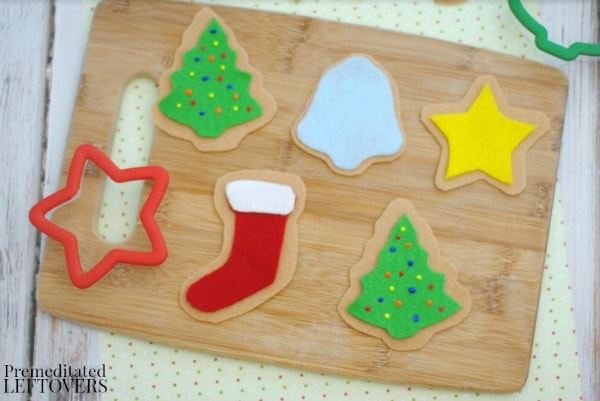
- Choose what cookie cutters you want to use. Cutters that are simpler in shape may be easier to use for this craft.
- Take one cookie cutter at a time and flip it over and trace the outside of the cookie cutter on the light brown felt. Cut out using scissors. Make sure your scissors are sharp as they will give you the best cut and shape.
- After the base is cut, set aside and choose what color felt you want to use as frosting on top of each cookie base.
- Trace the inside of the cookie cutter on the colored felt to make the 'frosting' and cut out using the scissors.
- After the Christmas tree frosting it cut, decorate using puffy paints to make it look like Christmas lights.
- Allow the puffy paint to dry completely.
- If using the cookies for pretend play, don't glue the frosting to the cookie. If you are using the cookies to create ornaments or garland, use clear glue to dry the frosting to the cookie. Allow to dry completely. Then use the notes below to make either ornaments or garland.
Notes
To make ornaments, cut holes in the tops of the cookies and string a ribbon through the hole. Tie a knot in the top of the ribbon and hang the cookie ornament on your tree. Felt Christmas Cookie Garland:
Make a lot of cookies (at least 10). Place a hole in the top of each cookie and string them all on a long piece or ribbon that is at least 2 feet longer than the place you plan to hang the garland. Lay the ribbon out and without attaching the cookies, evenly place where you plan to place each cookie. Then string the first cookie, placing a knot both before and after adding the cookie to secure it in place. If you want you can add a bead when making your knots. Repeat with the rest of the felt cookies. Hang your garland.
More Christmas Crafts for Kids:

Leave a Reply