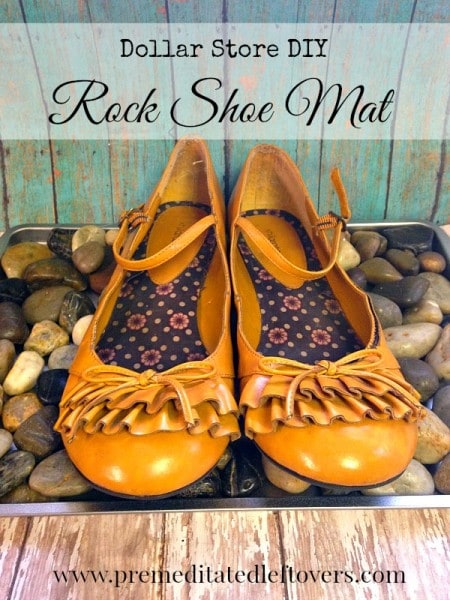
This winter season, keep floors clean and dry when you give this DIY rock shoe tray for shoes a try. A trip to your local dollar store is all you need, and in no time flat you can have a stylish floor mat perfect for resting your wet and muddy shoes on. Take a look at how you can get started making your own, as no one wants to spend the season scrubbing messy floors.
DIY Shoe Tray with Rocks
Supplies needed:
- Large cookie sheet
- Assorted crafting stones or stones from your yard
- Gorilla glue (optional)
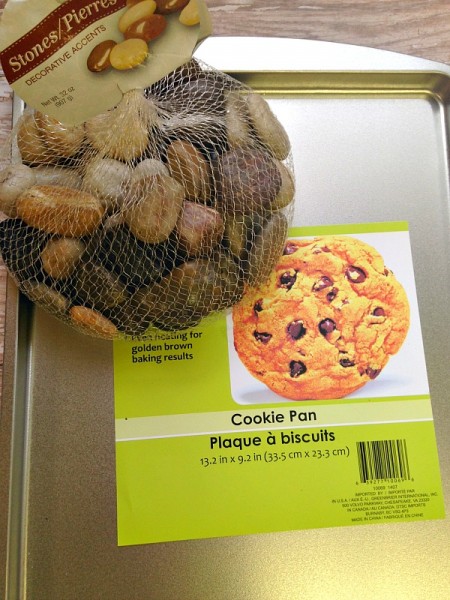
As mentioned, we found the rocks and the cookie sheet for just $1 each at our local Dollar Tree. Use the size cookie sheet that works for the number of shoes you wish to put on it. For the size we used (about 13×9) you can fit two pairs of adult shoes or about 4 pairs of children’s shoes. If you wish to fit more, just opt for a larger pan.
You can snag rocks for $1 a bag at Dollar Tree, but if you have some in your yard you can use go for it! Just rinse the rocks clean, dry them, and you are ready to go.
Directions:
1. If you wish to keep children from playing with the rocks, you will want to apply some adhesive to the tray before laying the rocks down. Just remove any paper labeling, apply a layer of glue, then lay the rocks on top.
2. If you wish to skip this step you may, and you can just remove any labels and create a layer of rock.
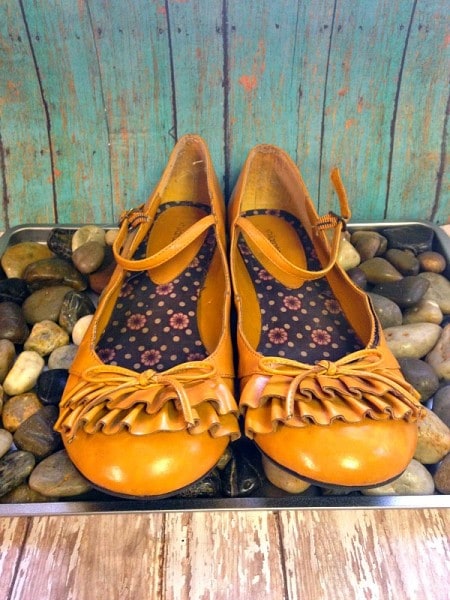
Place the tray by the front door so as soon as wet and muddy shoes enter, they can go on the mat. Dirt and debris will run to the bottom of the tray, while the rocks stay on top. This sure beats a muddy and dirty floor mat greeting guests, right?
To wash your rock shoe mat, just remove the rocks and wipe clean. If you used adhesive, just place in the sink and rinse.
Making your own DIY shoe tray with rocks is a cinch, and it is a great way to keep your front entry clean and stylish. Give it a try!

Ashley says
Hi there! Visiting from the Creative Collection link party. This is such a great idea! I love your shoes as well!
Rebecca says
I take my shoes off as soon as I get home and this sounds like a great idea for a shoe tray.
Sweet says
This is super easy. Thank you for sharing
Stella Lee@ Purfylle says
I would never think to do this. Such a clever idea and saves the carpets too! I’d love you to drop by and and your pin to Our Favourite Things Pinterest Party. http://bitly.com/1HhK9mn Then link up at #2UsesTuesday http://bit.ly/1G1X08f because this project is just perfect or TUT!
Cathy says
What a great idea. We could definitely use something like this at our front door. Thank you for sharing at Share It One More Time. Cathy
Hollie says
Great simple project! I have those cute yellow shoes too!
Brandi Clevinger says
I have seen this before, but completely forgot about it. I need to do this with my four kids (and husband) because we have no foyer and the wet shoes are ruining my carpet!
Thanks for sharing at Inspire Me Mondays!
Audra @ Renewed Projects says
What cute shoes!!! Seriously cute shoes! The perfect prop for your stone mat. 🙂
Al says
This is the same idea as one of my very first projects I posted, except I used a rubber mat instead of a cookie sheet. Several years later I still love it! Hopefully you find yours just as useful.
Angela @ Simply Beautiful By Angela says
I have seen something similar on pinterest but they used a glavanized tub. I love that you used a cookie sheet, so much flatter and cheaper. I may need to make a couple of these 🙂