• Home
  • About
    • Privacy Policy
  • Blog
  • Prep-Ahead Meals Cookbooks
  • Recipes
  • Lifestyle
  • Gardening
  • Kid’s Activities
  • Gluten-Free Recipes
  • Budgeting Tips
↑

Premeditated Leftovers™

Prep-Ahead Meals, Cooking Tips, and Frugal Living

  • Cookbooks
    • Prep-Ahead Breakfasts and Lunches
    • Prep-Ahead Meals From Scratch
  • Recipe Index
  • Members Area
    • Member Login
    • Join Us
  • Home
  • Blog
  • Recipes
  • Gluten-Free Recipes
  • Lifestyle
  • Garden
  • DIY
  • Kids
  • Budget

You are here: Home / Naturally Frugal Living / How to Dry Oranges

How to Dry Oranges

September 22, 2014 by Katie Femia 5 Comments

This post may contain affiliate links. Read our disclosure policy here.
22392 shares
  • Share
  • Tweet

How to Dry Oranges for Crafting and Cooking - Use this tutorial to dry orange slices. You can use the dried oranges in recipes, in crafts, or home decor.

It seems as though drying the picture perfect orange is a mystery. Well, at least until now! Below, you will find everything you need to know about how to dry oranges. With a little experimentation, we have found the perfect process for drying oranges. Dried oranges can be used in crafting, potpourri blends, cooking, and more. This process is also a great way to preserve oranges for later uses if they are about to go bad. Take a look at how you can dry oranges. The mystery has been solved!

How to Dry Oranges

Supplies needed:

  • Oranges
  • Kitchen knife
  • Oven
  • Oven rack

Directions:

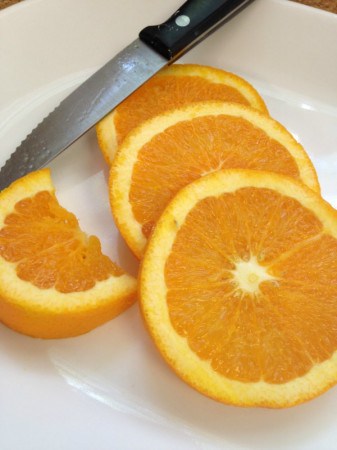
1. To begin, you want to slice your orange into 1/2 inch slices. Doing them any thinner risks oranges that will tear or stick. Doing them any thicker will take longer. Stick to the 1/2 inch rule and you will see great results.

How to Dry Oranges for Crafting and Cooking

2. Once your oranges are sliced, you want to place them on a baking rack or directly onto your oven racks. We placed ours directly on the oven rack. They are large enough that they won’t slip through. It is so important you pay attention to this step, because if you place the slices on a baking pan they will stick and burn. Allowing air to move through them via the rack is key!

3. Heat the orange slices on the rack at 275 degrees for two hours. Don’t rush this process. The key to great slices is a slow drying process, not a rushed or high heat one.

4. Remove the oranges and allow them to cool. You can let them dry on another rack or a plate.

How to Dry Oranges for Crafting and Cooking

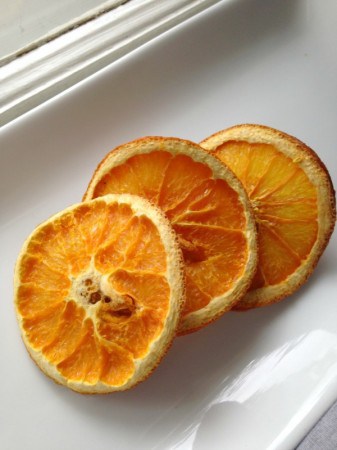
Aren’t they beautiful? Plus, they smell fantastic. Now, you are free to use your dried orange slices in cooking or crafting. Feel free to add some to your natural home cleaners, or add them to your potpourri mixtures. For a sweet smelling treat you can poke a hole, thread a ribbon, and you have an orange ornament that will reflect light through it like stained glass.

How to Dry Oranges for Crafting and Cooking

Use this method to dry some oranges for yourself. You will find that it works great!

More Ways to Dry Food

How to Dry Herbs – 3 Methods

How to Dry Herbs in a Paper Bag

How to get Started with Dehydrating Foods

22392 shares
  • Share
  • Tweet

Comments

  1. Barbara Karr says

    January 28, 2019 at 7:08 am

    How do you use them as food after they are dried?

    Reply
    • Friggashearth says

      December 13, 2020 at 8:48 am

      They are for decorating and crafting.

      Reply
  2. Darlene says

    November 3, 2018 at 11:18 am

    HI Katie!
    These are beautiful. I would like to try with a blood orange also-just for other shades of the orange at Christmas time. Thank you for your tutorial. I look forward to making these.
    Darlene
    Nova Scotia

    Reply
  3. Theresa Scholtz says

    December 6, 2014 at 5:03 pm

    Those look perfect! I’m going to try it out, and hang a few in the Christmas tree. Thanks for doing all the experimenting for us! 🙂

    Reply
  4. Lisa @ The Wellness Wife says

    October 28, 2014 at 6:08 am

    Thanks! I love the dried fruit decorating look but don’t want to buy a dehydrator. This is great!

    Reply

Leave a Reply Cancel reply

Your email address will not be published. Required fields are marked *

Recipe Rating


Search

Prep-Ahead Breakfasts and Lunches by Alea Milham

Recent Articles:

Free Printable St. Patrick's Prayer

St. Patrick’s Breastplate and 4 Printables of St. Patrick’s Prayer

DIY Moth Repellant Bags

Early Spring Cleaning - March Cleaning Checklist to help clear away the winter mess and organize winter gear

Early Spring Cleaning Tips and March Cleaning Checklist

Prep-Ahead Meals from Scratch Where to Buy

BROWSE:

  • Blog
  • Cookbooks
  • Recipe Index
  • Members Area

ABOUT:

  • About
  • Contact
  • Privacy Policy
  • Disclosure

Welcome. I'm Alea!

On Premeditated Leftovers I share simple recipes made with whole foods, practical shopping tips, time saving techniques, and meal planning strategies. I also share tips for minimizing food waste, so more of the food that is purchased ends up on the table.

While volunteering as a budget counselor, I realized that food is the element of most people’s budgets where they have the greatest control. I set out to develop low-cost recipes from scratch to prove it’s possible to create delicious meals on a limited budget. Eating well while spending less is about more than just creating recipes using inexpensive ingredients; it’s about creatively combining ingredients so you don’t feel deprived and are inspired to stick to your budget.

Copyright ©2023, Premeditated Leftovers™. All Rights Reserved.
Design by Pixel Me Designs