• Home
  • About
    • Privacy Policy
  • Blog
  • Prep-Ahead Meals Cookbooks
  • Recipes
  • Lifestyle
  • Gardening
  • Kid’s Activities
  • Gluten-Free Recipes
  • Budgeting Tips
↑

Premeditated Leftovers™

Prep-Ahead Meals, Cooking Tips, and Frugal Living

  • Cookbooks
    • Prep-Ahead Breakfasts and Lunches
    • Prep-Ahead Meals From Scratch
  • Recipe Index
  • Members Area
    • Member Login
    • Join Us
  • Home
  • Blog
  • Recipes
  • Gluten-Free Recipes
  • Lifestyle
  • Garden
  • DIY
  • Kids
  • Budget

You are here: Home / Naturally Frugal Living / Rustic DIY: Tree Stump Pumpkin

Rustic DIY: Tree Stump Pumpkin

October 3, 2013 by Katie Femia Leave a Comment

This post may contain affiliate links. Read our disclosure policy here.
3231 shares
  • Share
  • Tweet

Rustic DIY Tree Stump Pumpkin

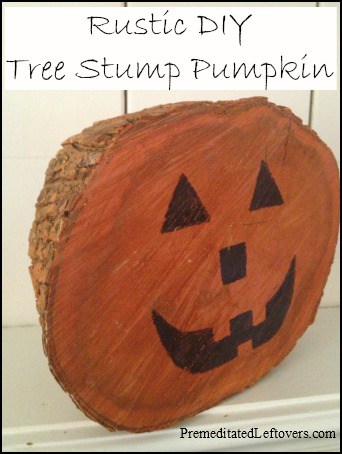
Home décor is always more fun when it is found in the most unexpected places. Taking an ordinary object and turning it into something extraordinary is not as hard as you may think, and not nearly as expensive as you might imagine. For example, take a peek at the rustic and original DIY project below. This tree stump pumpkin is the perfect example of a pumpkin popping up in one of the most unexpected places! You can make your own tree stump pumpkin with minimal supplies and in just a short amount of time. Take a peek!

Tree Stump Pumpkin:


Supplies Needed:
Tree stump
Standard saw
Orange and black paint
Mid grade sandpaper
Paint brushes
Cardboard
Scissors

Where do you find a tree stump exactly? You would be surprised how many family and friends may have a stump in their yard you can cut from. Or, visit a local gardening center that sells trees and see if they have any you can cut from. Once you have found a small stump, trim a 2 inch thick piece from across the trunk. Oh, and because this DIY requires some cutting with a saw, you of course want to complete some parts of this project before turning the reigns over to children.

Directions:
1. With warm water and dish soap, clean the piece of cut stump well. Once dry, sand it lightly until the inside face of the piece is smooth.
2. Next, apply orange paint to the entire piece of wood using your paintbrush. You may wish to allow some drying time and add a second coat for best coverage and color.
3. Once your orange paint is dry, you can now begin to put the face on your pumpkin. You can do this a number of ways. You can freehand it of course, using black paint and your brush. Or, using cardboard and scissors, you can cut shapes into the cardboard. Then, place the cardboard on the flat surface of the wood. Using your paintbrush, start applying paint to the inside of your shape so the cardboard acts as a stencil guiding you along.

Once finished, you can apply an optional coat of clear sealant to protect the piece and make it last for years to come. Give this tree stump pumpkin a try and enjoy a fresh spin on pumpkin décor!

More Fall Craft Projects:

  • Fall Leaf Crafts for Kids
  • Rustic Pumpkin Made with Fall Leaves
  • No-Carve Pumpkin Decorating Ideas
  • Decorating for Fall with Candy Corn
  • Framed Vintage Leaf Art
  • Spooky Glamorous Tablescape
3231 shares
  • Share
  • Tweet

Leave a Reply Cancel reply

Your email address will not be published. Required fields are marked *

Recipe Rating


Search

Prep-Ahead Breakfasts and Lunches by Alea Milham

Recent Articles:

diy giant christmas decorations including large outdoor christmas decorations and oversized indoor holiday decor

15 DIY Giant Christmas Decorations

easy diy gift ideas for girls with directions

10 DIY Christmas Gift Ideas for Girls

10 DIY Christmas Gift Ideas for Boys

Prep-Ahead Meals from Scratch Where to Buy

BROWSE:

  • Blog
  • Cookbooks
  • Recipe Index
  • Members Area

ABOUT:

  • About
  • Contact
  • Privacy Policy
  • Disclosure

Welcome. I'm Alea!

On Premeditated Leftovers I share simple recipes made with whole foods, practical shopping tips, time saving techniques, and meal planning strategies. I also share tips for minimizing food waste, so more of the food that is purchased ends up on the table.

While volunteering as a budget counselor, I realized that food is the element of most people’s budgets where they have the greatest control. I set out to develop low-cost recipes from scratch to prove it’s possible to create delicious meals on a limited budget. Eating well while spending less is about more than just creating recipes using inexpensive ingredients; it’s about creatively combining ingredients so you don’t feel deprived and are inspired to stick to your budget.

Copyright ©2025, Premeditated Leftovers™. All Rights Reserved.
Design by Pixel Me Designs