• Home
  • About
    • Privacy Policy
  • Blog
  • Prep-Ahead Meals Cookbooks
  • Recipes
  • Lifestyle
  • Gardening
  • Kid’s Activities
  • Gluten-Free Recipes
  • Budgeting Tips
↑

Premeditated Leftovers™

Prep-Ahead Meals, Cooking Tips, and Frugal Living

  • Cookbooks
    • Prep-Ahead Breakfasts and Lunches
    • Prep-Ahead Meals From Scratch
  • Recipe Index
  • Home
  • Blog
  • Recipes
  • Gluten-Free Recipes
  • Lifestyle
  • Garden
  • DIY
  • Kids
  • Budget

You are here: Home / Naturally Frugal Living / DIY Rustic Tin Can Pumpkins

DIY Rustic Tin Can Pumpkins

September 27, 2014 by Jody 1 Comment

This post may contain affiliate links. Read our disclosure policy here.
1924 shares
  • Share
  • Tweet

Rustic Tin Can Pumpkins - An Upcycled DIY Project - These easy tin can pumpkins are made with recycled tin cans, screws, and a little bit of spray paint.

I am becoming quite addicted to upcycled projects, while I do love saving money by not buying cute decor at expensive home stores its not just  for that reason- It is the thrill of turning cast aside items or even trash into “treasures”.  I also really like the look of anything industrial with a softer element to give it an interesting contrast. Finally, I really enjoy decorating for Fall- pumpkins, leaves, scarecrows, anything that celebrates the harvest season- this project fit all my requirements.

How to Make a Rustic Tin Can Pumpkins

Supplies Needed:

  • 3 tin cans-various sizes
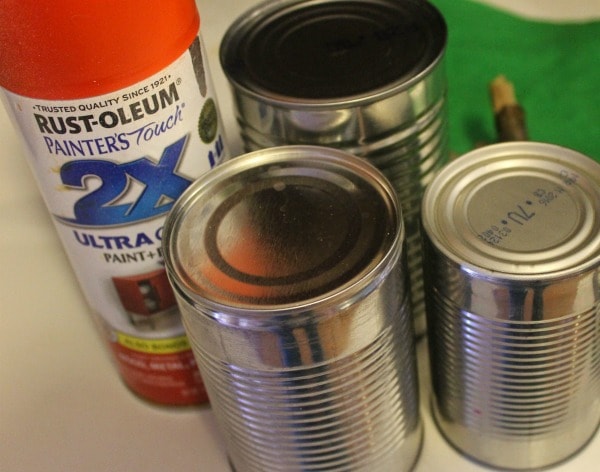
  • orange spray paint
  • 3 screws
  • green felt
  • hammer
  • hot glue gun/glue sticks

supplied needed for Rustic Tin Can Pumpkin Patch


Directions:

Remove paper from aluminum cans, wash and dry thoroughly. If there are rough edges, remove with pliers and smooth with sandpaper.

Wipe cans down well with an rubbing alcohol dampened paper towel to remove dirt and oil, this will help the paint stick better.

Place cans outside in a well ventilated area on newspaper.  Spray with a light tack coat of paint, allow to dry for 5 minutes before adding a second and third coat if needed to achieve your desired coverage. After final coat let it dry for at least 3 hours before adding decoration.

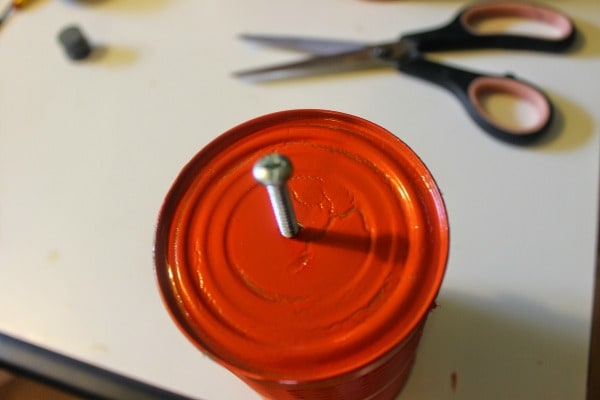
Use the hammer to pound the tip of your screw into top of can up to the first thread, screw it in a few times until it grips into can well but is still mostly sticking out.

how to make a pumpkin from a recycled can

Cut several leaf shapes from felt and hot glue to the top of your pumpkin, scrunching and tucking to make it look more alive.

If you are going to keep your pumpkins outside you may want to spray it with a couple coats of clear spray to further protect it.

More DIYFall Decor Ideas

  • Rustic DIY: Tree Stump Pumpkin
  • Rustic Pumpkin Made with Fall Leaves
  • No-Carve Pumpkin Decorating Ideas
  • How to Make a Pumpkin Lantern
  • DIY Rustic Wood Pumpkins
  • Decorating for Fall with Candy Corn
  • Framed Vintage Leaf Art
  • Spooky Glamorous Tablescape
  • Dollar Store DIY: Frugal Fall Tablescape

Would you like to save this article?

We'll email this post to you, so you can come back to it later!

1924 shares
  • Share
  • Tweet

Comments

  1. Connie says

    October 11, 2018 at 4:17 am

    Great idea!

    Reply

Leave a Reply Cancel reply

Your email address will not be published. Required fields are marked *

Recipe Rating


Search

Recent Articles:

Spring Cleaning Checklists Room by Room Cleaning Tips

Spring Cleaning Checklists Room by Room Cleaning Tips

Tips for Organizing Your Home for Spring Cleaning

Tips for Organizing Your Home for Spring Cleaning

Tips for Decluttering Your House for Spring Cleaning

Tips for Decluttering Your House for Spring Cleaning

BROWSE:

  • Blog
  • Cookbooks
  • Recipe Index

ABOUT:

  • About
  • Contact
  • Privacy Policy
  • Disclosure

Welcome. I'm Alea!

On Premeditated Leftovers I share simple recipes made with whole foods, practical shopping tips, time saving techniques, and meal planning strategies. I also share tips for minimizing food waste, so more of the food that is purchased ends up on the table.

While volunteering as a budget counselor, I realized that food is the element of most people’s budgets where they have the greatest control. I set out to develop low-cost recipes from scratch to prove it’s possible to create delicious meals on a limited budget. Eating well while spending less is about more than just creating recipes using inexpensive ingredients; it’s about creatively combining ingredients so you don’t feel deprived and are inspired to stick to your budget.

Copyright ©2026, Premeditated Leftovers™. All Rights Reserved.
Design by Pixel Me Designs

Share anywhere