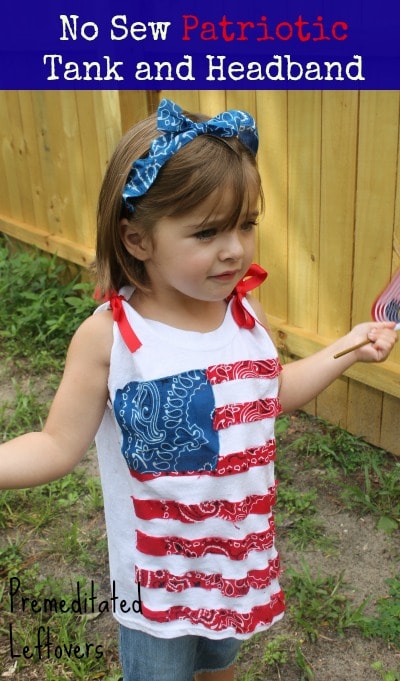
I love crafting and DIY projects, but one area where I am not very comfortable or skilled in is sewing. I could sew a relatively straight line with a sewing machine to create a valance but I would rather not- I am also to lazy busy to pull out the machine, thread the top, bobbin, etc. So often my “sewing” projects are done with iron on adhesive– hem tape. While I don’t enjoy ironing in general I love the quick and simple projects I can finish with a roll of this stuff, my iron, and 20 minutes. I have seen a lot of cute American Flag shirts circulating, they either required sewing or paint, I really wanted a cute Americana look with fabric. Enter a couple of $.99 bandana’s and my trusty roll of iron on adhesive. This is what I came up with…

Supplies Needed:
- Plain White T-shirt
- 1 red bandana
- 1 blue bandana
- 7/8″ Iron-on Adhesive
- 2- 18″ long pieces of red ribbon
- Scissors
- Iron/Iron board
Directions:
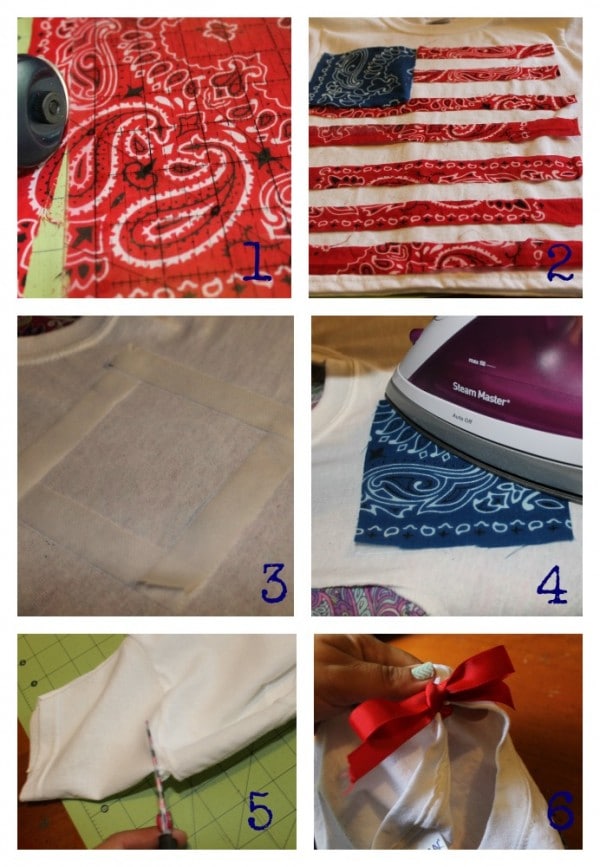
First cut off the plain edge of your bandanna, the patterned part looks much cuter on this shirt.
1. Cut strips 1″ wide the entire length, you will use some nearly full length and some in half as you can see. I was able to make 13 stripes like our flag, including the white t-shirt area. If you are making a smaller shirt (Mine was 3t or XS) you may need to cut your strips smaller or use less stripes. Cut a square from the blue bandanna roughly 3″x 4.5″.
2. Slide shirt over the wide end of ironing board. Lay your red strips and blue rectangle on the shirt to get an idea of placement. Play with it until it looks good to you.
3. Fold back each strip and place a piece of iron on adhesive the same length as each piece, for the blue rectangle use 4 small pieces the length of each side to fasten it down well.
4. Iron- follow package directions as it sometimes varies slightly. For mine I pressed my iron very slowly over each piece, make sure to cover it all so it adheres completely.
5. Cut off sleeve, do this as close as you can on the outside of the seam of the sleeve.For a more Americana/Folk look, I washed and dried the shirt. I wanted the edges frayed just a bit. The adhesive should keep it from fraying more than just a bit, which is why you want to use the adhesive just a bit smaller than your strips. Take scissors and cut off all the strings hanging after washing.
6.Finally, to make it a bit more girly, I tied each shoulder up with a ribbon. I think it adds a sweet feminine touch to this plain boys shirt.
To further girl up this shirt I wanted to make a matching headband, I used a small plain headband that we picked up at Dollar Tree, and cut a blue strip 1″ wide, tied it into a bow slightly off center. Then I “ruffled” it a bit on either side of the headband and secured it with a couple dabs of hot glue.

I think it came out pretty cute and both pieces took me 20 minutes start to finish. For my little boy I made it exactly the same way minus the bows on the shoulder, they are all ready to celebrate the 4th.
More DIY 4th of July Ideas
- Red, White, and Blue Handkerchief Bunting
- Frugal Patriotic Table Decor Ideas for Kids
- Elegant Patriotic Table Decor Ideas
- 10 DIY Patriotic Decor Ideas
- 10 Patriotic Dessert & Snack Recipes
- 10 Patriotic Crafts for Kids

Christine T says
This is so cute, Jody! I am not skilled in sewing, either so I love this idea!