• Home
  • About
    • Privacy Policy
  • Blog
  • Prep-Ahead Meals Cookbooks
  • Recipes
  • Lifestyle
  • Gardening
  • Kid’s Activities
  • Gluten-Free Recipes
  • Budgeting Tips
↑

Premeditated Leftovers™

Prep-Ahead Meals, Cooking Tips, and Frugal Living

  • Cookbooks
    • Prep-Ahead Breakfasts and Lunches
    • Prep-Ahead Meals From Scratch
  • Recipe Index
  • Members Area
    • Member Login
    • Join Us
  • Home
  • Blog
  • Recipes
  • Gluten-Free Recipes
  • Lifestyle
  • Garden
  • DIY
  • Kids
  • Budget

You are here: Home / Naturally Frugal Living / DIY Patriotic Flag Chargers

DIY Patriotic Flag Chargers

June 18, 2018 by Alea Milham Leave a Comment

This post may contain affiliate links. Read our disclosure policy here.
333 shares
  • Share
  • Tweet

Use this tutorial to make Patriotic Flag Chargers for your 4th of July gathering.

how to make patriotic flag plate chargers.

Have you envied the beautiful tablescapes you see on Pinterest or at a crafty friends house? Me too! That’s why I decided to set out to create my own in an affordable and easy way (so easy my 7-year-old helped me make them).  You can make a more traditional flag or change up the pattern any way you like to create a patriotic place setting to dress up your 4th of July table indoors or out.

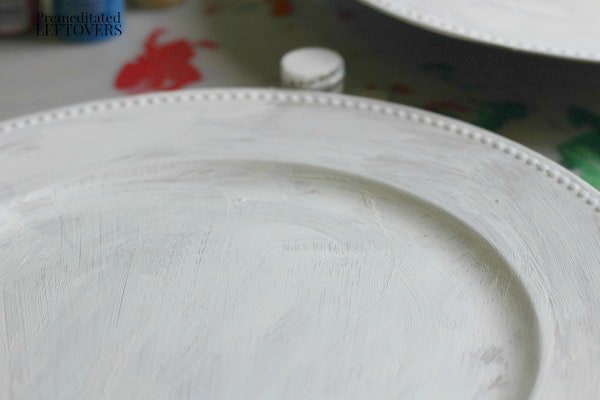
I picked up my chargers at Dollar Tree but you can find them at Hobby Lobby or other craft stores as well. I wasn’t able to get my hands on white chargers, so I picked up gold ones in the store, and then started by painting them white. However, if you have enough time, you can find white chargers and skip the step of painting them white.

Patriotic Flag Charger Tutorial

Do not attempt this on plates you will be eating directly off of as it is not a food safe application.

Items needed:

  • 13-inch Plastic charger plates
  • Red, white, blue acrylic paint
  • Foam brushes
  • Star stickers
  • Painters tape
  • Clear spray paint

Directions:

  1. The first thing you want to do is to run some fine sanding paper over your plate to rough up the coating a little and help the paint adhere a little better. Wipe the dust away with a slightly damp cloth.
  2. If you weren’t able to get white chargers you will need to paint them with a base coat (well 2 coats actually). Let the paint dry for an hour or two. Start with a white charger or paint your plate white.
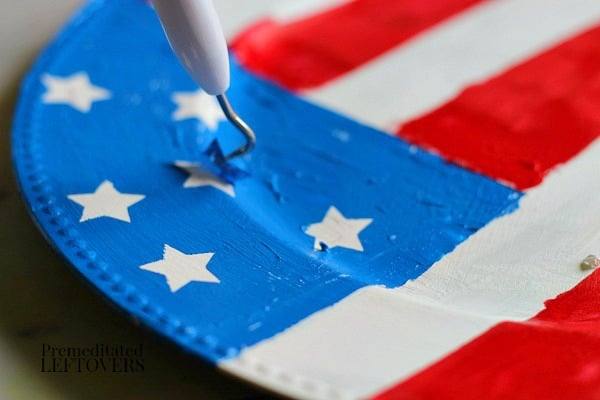
  3. Once the base is dry or if you are using white chargers tape off your design with painters tape, be sure to press it firmly all along the tape so you get crisp lines. Add star stickers wherever you like, pressing them in firmly as well. Use painters tape and star stickers to mark off white sections sections then paint it red and blue to create your patriotic flag chargers.
  4. Paint your red stripes and blue square. Let dry for about 15-20 minutes but not completely dry then remove painters tape and star stickers carefully. Let dry for 3 to 4 hours. Pull up the star stickers and peel the painters tape to reveal the patriotic flag design on the charger.
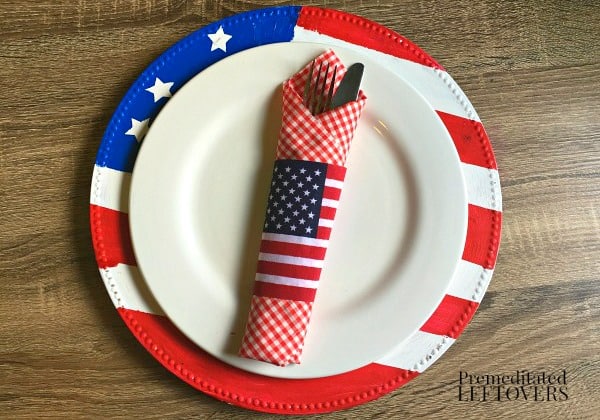
  5. To make your paint last longer and hold up well spray with 2 coats of clear spray, dry overnight.

Add a simple white plate, and silverware wrapped in a coordinating napkin (I made my Gingham napkins using this tutorial.) and small flag (pack of 4 at Dollar Tree). Each place setting cost me about $3 from napkin to charger!

DIY patriotic table decor idea. Place setting includes a flag charger, gingham napkin, and flag napkin ring.

More Patriotic Table Decor Ideas

Elegant Patriotic Table Decor Ideas

Frugal Patriotic Table Decor ideas for Kids

333 shares
  • Share
  • Tweet

About Alea Milham

Alea Milham is the owner of Premeditated Leftovers and the author of Prep-Ahead Meals from Scatch. She shares her tips for saving money and time while reducing waste in her home. Her favorite hobby, gardening, is a frugal source of organic produce for her recipes. She believes it is possible to live fully and eat well while spending less.

Leave a Reply Cancel reply

Your email address will not be published. Required fields are marked *

Recipe Rating


Search

Prep-Ahead Breakfasts and Lunches by Alea Milham

Recent Articles:

Free Printable St. Patrick's Prayer

St. Patrick’s Breastplate and 4 Printables of St. Patrick’s Prayer

DIY Moth Repellant Bags

Early Spring Cleaning - March Cleaning Checklist to help clear away the winter mess and organize winter gear

Early Spring Cleaning Tips and March Cleaning Checklist

Prep-Ahead Meals from Scratch Where to Buy

BROWSE:

  • Blog
  • Cookbooks
  • Recipe Index
  • Members Area

ABOUT:

  • About
  • Contact
  • Privacy Policy
  • Disclosure

Welcome. I'm Alea!

On Premeditated Leftovers I share simple recipes made with whole foods, practical shopping tips, time saving techniques, and meal planning strategies. I also share tips for minimizing food waste, so more of the food that is purchased ends up on the table.

While volunteering as a budget counselor, I realized that food is the element of most people’s budgets where they have the greatest control. I set out to develop low-cost recipes from scratch to prove it’s possible to create delicious meals on a limited budget. Eating well while spending less is about more than just creating recipes using inexpensive ingredients; it’s about creatively combining ingredients so you don’t feel deprived and are inspired to stick to your budget.

Copyright ©2023, Premeditated Leftovers™. All Rights Reserved.
Design by Pixel Me Designs