Racquel is sharing how to make a DIY, no-sew window treatment by using fabric strips to create a valance.
Window treatments can be a difficult item to purchase or make yourself. There tons of options out there but often they are very expensive to purchase or very complicated to make. If you are lucky enough to have the talent to make them, finding great fabric at a reasonable price can really be a challenge.
How to Make a Fabric Strip Valance
This is a great option for a window treatment that doesn’t require a lot of money, time, or skill to create. In fact, this valance which hangs above a 36” window, took less than an hour to make and the supplies were purchased for less than $15 (which bought enough to do two windows of the same size).
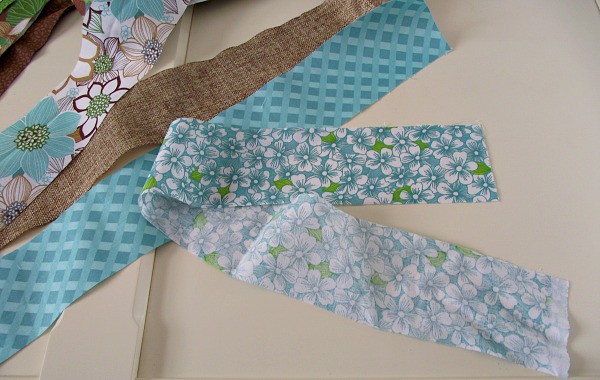
About the supplies: With quilting becoming such a popular craft, many stores now sell fabric pre-cut and packaged in coordinating patterns and colors. The fabric shown here was purchased as a pre-cut package. There were several patterns and colors and all were cut to 42” long by 2 ½” wide. To give the valance some extra texture, a spool of ribbon was purchased as well. The only cutting that was required was to cut the 42” strip in half.
Supplies:
- Fabric strips of varying colors and prints cut to 2 ½” wide x 21” long
- Scissors
- curtain rod
Directions:
Step 1. Lay out the fabric strips alternating colors and patterns to create the overall pattern you desire.
Step 2. Carefully lay a single piece of fabric over the curtain rod. This should be offset rather than evenly laid over.
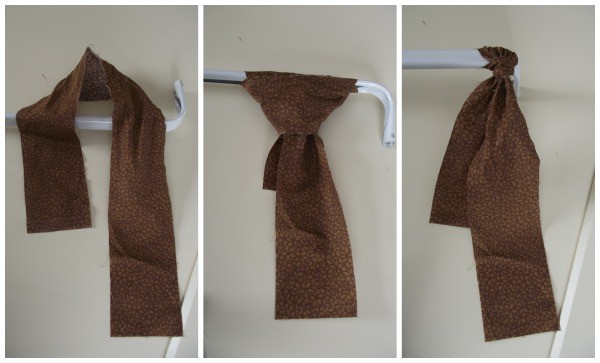
Step 3. Draw the ends of the fabric through the loop you’ve created and pull tightly to create a knot.
Step 4. Repeat with remaining fabric, creating the pattern you choose.
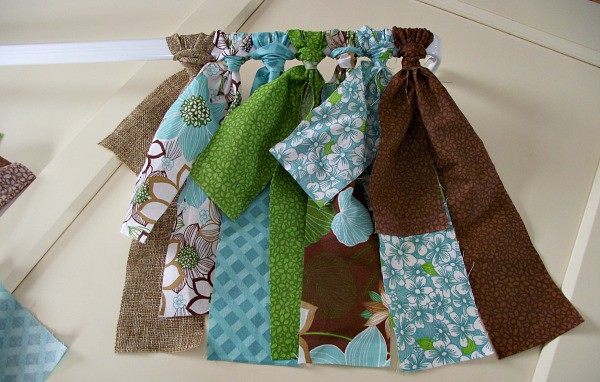
Step 5. After knotting all fabric to the curtain rod and mounting the hardware to the window trim or window wall, hang the finished fabric valance and step back to enjoy your DIY, no sew valance!
More Frugal DIY Home Decor Ideas
- How to Make Chalk Paint
- 5 Tips for Perfectly Painted Furniture
- 10 Ways to Repurpose Old Suitcases
- How to Decorate Furniture with Decals
- DIY Vintage Dresser makeover

Veronica P says
Oh I love this idea! I have so many of my mom’s scraps & I didn’t know what to do with & I’ve been looking at valance ideas…just so perfect❣️
Beverly says
How many strips do you add to a 40” rod? Overlap them. Space them? Etc?
Frani Willis says
Love this idea! I am like Carla in the above statements, how do you clean? Could you use a thick piece of rope and sew it onto a rod pocket to keep the valance together for cleaning?
June DeNigris says
I have moved into a new house where the rods were left. Good expensive draw rods. What kind of curtains can I put on there?
Sharon G. says
I love this idea, but I don’t understand how to make the knot. I’m new at this. This is a great idea for my bathroom. I can pick my own material for the look I want!
Debbie says
I didn’t either. I had to look at it for 1/2 an hour. DebbbThat loop you see at the top? You take the two ends underneath the rod and bring them through that opening.
Christina Avalon says
I’d also like to know how to keep the edges from fraying and pulling off those annoying little threads. Fabric glue?
Sarah says
Do the edges fray? I made a quilt for my daughters bed and have extra fabric. It would be fun to make a valance to go with it…
Angela C. says
This is very creative.
Carla says
I love this! I think it would work great in my kitchen. To keep it clean do you just vacuum or do you take it down, wash it, and put it back up?