Would you like to make baby food from scratch? Here is how to get started making homemade baby food:

![]()
Introducing baby food is an exciting time for both parent and baby. The reactions on your child’s face as they discover new flavors and textures is priceless and notes a milestone in their lives as they become one step closer to table food.
Making your own homemade baby food is very simple and offers a variety of benefits. By creating your own portion sizes you cut down on waste and unused food. Also, you have the ability to control every single ingredient that goes into your child’s mouth. No need for preservatives or artificial colors. You can create endless flavor combinations of fruits, veggies, meats, and grains that are both delicious and nutritious. If you think you’re ready to start making your own homemade baby food, here are a few tips to help you get started.
How to Get Started Making Homemade Baby Food
When To Introduce Solid Foods
If you think your child is ready to try baby foods and they are at least 6 months old, here are a couple of signs to look for:
- Your child has good head and neck control.
- Your child is able to sit well with little or no support.
- When you put a bottle or spoon in front of your child they show interest by opening their mouths or trying to reach for the object.
Serve a Variety of Foods
Coming up with your own combinations of foods can be a lot of fun. Once your child has been introduced to each food individually you can begin to mix them together in your own creative and yummy combinations. It isn’t imperative that one type of food be introduced before the other, but there are a few recommendations that may help the process go smoothly.
1) Introduce vegetables before fruit. The notion behind this is that your child may be less willing to give vegetables a chance after discovering the sweet flavors of the fruits.
2) Introduce meats last, once your child has become accustomed to the textures of pureed foods. Pureed meats such as beef and poultry tend to have a dryer, grainier consistency that initially may not be as favorable to babies.
3) Grains including barley and oats can be introduced once your child is able to eat with a spoon on their own. These can be easily blended in with fruits, vegetables, and meats.
4) Prepare and serve foods plain, do not add any additional sugar, salt, or seasonings.
Baby Food Preparation Techniques
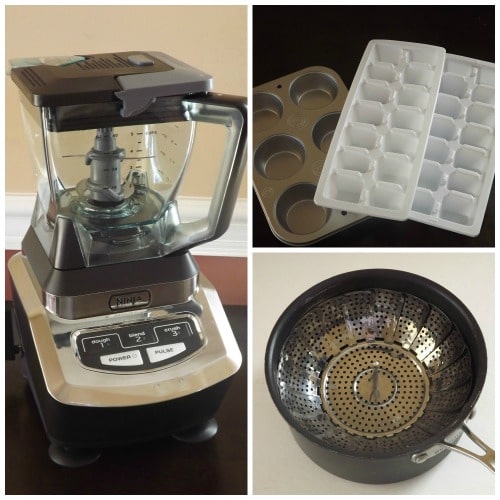
![]()
Preparing your own homemade baby food can be done in a variety of ways. It’s important that each food is properly cleaned, cooked, and stored to reduce the risk of food-borne illness and contamination. You will want to follow the same cooking guidelines as you would when preparing food for yourself or the rest of your family.
- Always wash your hands prior to preparing any foods.
- Work on a clean surface with clean equipment and cooking utensils
- Never cross contaminate surfaces but cutting vegetables or fruits on the same surface on which you previously cut meat.
Baking, steaming, and boiling are the most common ways to cook fruits, vegetables, and meats used in homemade baby food. Not only will these methods completely cook the foods, but they will also aid in breaking them down making it easier for your baby to digest them.
To bake you simply place the fruit, vegetable, or meat on a baking sheet and cook for the desired amount of time. In some cases, you will peel and chop the fruit or vegetable prior to baking.
To steam, you will need a steamer basket and a medium sized pot or saucepan. Pour a small amount of water into the bottom of the pot, insert the steamer basket, and add the fruit or vegetable you wish to cook. Cover and allow the water to boil thus creating steam and cook for the desired amount of time.
To boil, you will bring a pot of water to a boil and cook the food down until it is softened. Boiling is a less desirable method because some of the food’s nutrients are lost in the process.
Once the food is cooked, you must puree it prior to serving. There are a number of ways to do this. There are several electric blenders and food processors on the market designed for making homemade baby food, as well as smaller tools for mashing the foods by hand. While these items are helpful, it is just as easy to use a standard blender or hand mixer as long as you are able to completely puree the food prior to serving.
The last step of baby food preparation is storage. Equipment sold specifically for making homemade baby food like the Baby Bullet come with its own individual containers that can be sealed and stored in the freezer or refrigerator. Otherwise, you can use a number of other common kitchen items to individually store the foods.
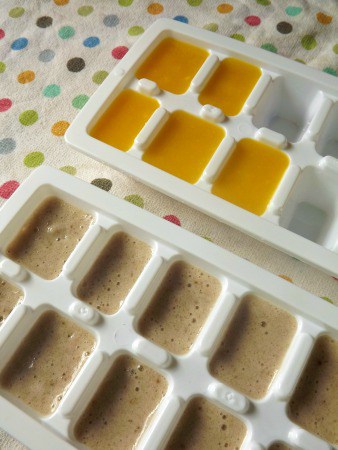
![]()
1) Pour the pureed food into ice cube trays. Cover them with plastic wrap and freeze. You can then conveniently pop out the individual servings as needed, thaw and serve. These individual servings can also be popped out after freezing and stored in labeled freezer bags. You can find plastic ice cube trays in sets of 2 for $1 at The Dollar Tree stores, or check out these snazzy Silicone Ice-Cube Trays![]() found on Amazon.
found on Amazon.
2) Pour the pureed food into standard sized or mini sized muffin tins and cover with plastic wrap before freezing. This allows you to further control portion sizes as you get an idea of how much your baby will eat at each meal.
3) Store pureed food in individual glass or plastic sealable containers. These are a good option for freezing or refrigerating.
Always label anything you make so you can quickly reference how long it has been stored. To avoid spoiling or bacterial growth, foods should always be frozen or refrigerated as soon as possible after being cooked. Foods can be kept refrigerated for 24-48 hours. Frozen foods can be stored up to a month, or longer in a deep freezer.
Homemade Baby Food Recipes:
How to Make Baby Food Using Fruits
Basic Recipes to Make Baby Food from Vegetables
How to Make Baby Food with Grains
How to Make Homemade Baby Food with Meats
How to Transition Toddlers to Solid Food
More Natural Baby Articles:
How to Make Reusable Cloth Baby Wipes
How to Save Money Using Cloth Diapers
Cloth Diapering: What You Need to Know to Get Started

Sarah says
I saved the plastic containers from when I was buying store bought foods. They work really well in measuring how much my babe is getting
Crystal says
Just a tidbit… Breast milk storage bags are great to freeze baby food in. Freezer safe, you can measure and store easier. 🙂
Marie Czarnecki says
My comment on baby food: I made my own food in a blender, meat, veggies, and fruit, all fresh, my kids also had the good of mashed potatoes and gravy. I was not in the time where the docs said no food for the kids until 6 months, I fed my babies cooked cereal, rice, and other like it.. I had no problem at all and my babies grew up to be very healthy(in fact real healthy). I just do not listen to the stupidity of some docs as they think now a days. My babies were drinking powered “NON FAT” milk at two months.. This BS that these new docs say not true.. That is my “SPEAK MY MIND”