Transitioning to solid food is quite the milestone in your child’s early years. As a parent you can now offer your baby a variety of different flavors in addition to the breast milk or formula that will still remain their main source of nutrition until the age of one. Typically, fruits and vegetables are among the first foods pediatricians recommend. Some will further suggest that vegetables be introduced before fruit. The idea behind this is that some little ones may enjoy the sweet flavors of fruit so much that they are reluctant to give vegetables a try. Again, this is only a recommendation, and there’s a good chance your child will welcome the new flavors of vegetables just as much.
If your baby is at least six months old and has met the guidelines for baby food readiness, the primary vegetables that you’ll want to offer are going to be easily identified as orange or green. For example: carrots, sweet potatoes, and butternut squash in the orange category; and peas and green beans as common green vegetables. In addition to these, there are several other vegetables that may please your baby’s palate: broccoli, cauliflower, avocado (uncooked), corn, and spinach. If you are new to making homemade baby food you might want to read How to Get Started Making Homemade Baby Food for an overview.
Initially, it’s important to offer one vegetable at a time, spaced at least a few days apart. This will give you the opportunity to monitor your baby for any negative reactions and the ability to easily identify which food caused the problem. It is not uncommon for solid foods to change the look and frequency of bowel movements, but if you notice any skin irritation, diarrhea, or vomiting you should consult your pediatrician.
The smallest jars of commercial baby food are 2.5 ounces. That is equivalent to 5 tablespoons of purée, and a great starter model for how much food to prepare for each meal. Once you have a better idea of how much food your child will eat, you can adjust the amount of food to include in each serving. You can then add only this amount to your storage containers or ice cube trays, and greatly reduce the amount of wasted food.
The consistency of your vegetable purées should be runny in the early stages of food introduction, thus making them easier for your baby to swallow. Use a baby spoon and offer your baby about half of a spoonful at a time. Gradually increase the amount of food you add to each spoon, and the thickness of each purée as your child progresses each month. Try not to water down the purées to reach the desired consistency, but rather add formula or breast milk. You can still freeze the purees with these added ingredients as long as they haven’t been frozen and thawed initially.
Once you have introduced different vegetables separately, you can make your own combinations of two or three complimenting vegetables. Remember, just because you don’t care for a certain vegetable doesn’t mean your baby won’t like it either! Here are a few simple instructions to get your started on preparing you own homemade vegetable purées.
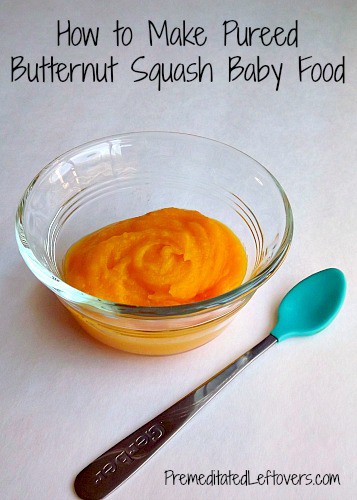
Puréed Butternut Squash Baby Food
Ingredients and items needed:
- 1 butternut squash
- 9”x13” or larger baking dish or rimmed baking sheet
- Food processor or blender
- Ice cream scoop or large spoon
- Tin foil
- Water
- Optional: breast milk or formula
Directions:
1.) Preheat your oven to 375°.
2.) Begin by rinsing off the squash and scrubbing away any dirt or debris. (Though you wont be serving the skin, you don’t want any dirt to contaminate the water in the baking process.)
3.) Cut the squash in half lengthwise and place face down on the baking sheet.
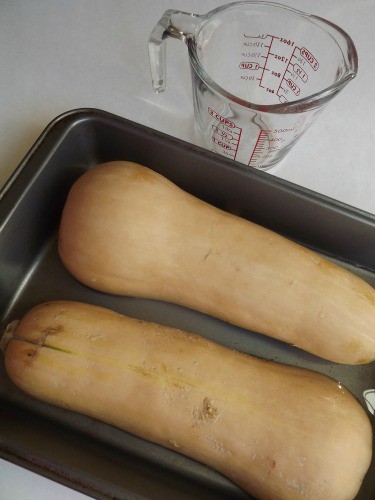
4.) Add a small amount of water to rise about 1 inch up the side of the squash. The purpose of this is two fold. The water will prevent the squash from sticking to your bake ware, and will also create steam to aid in the cooking process.
5.) Cover the baking sheet with tin foil and place in the oven for 45 minutes.
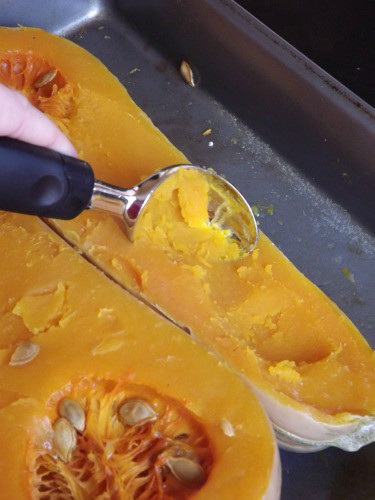
6.) Remove, flip the squash over right side up, and stab with a fork in a few different areas to determine the softness of the squash.
7.) If you can easily stab or mash it, you can remove the squash and allow it to cool. If it is still too dense, return it to the oven in 10 to 15 minute increments. Cooking times will vary depending on the size of your squash.
8.) Once the squash has cooled enough to touch, discard any seeds and scoop out the soft inside. An ice cream scoop is the perfect tool for this:
9.) Place it in your food processor or blender and puree until smooth. Add a small amount of water, breast milk, or formula until you reach the desired consistency. *Remember, when first introducing purées you’ll want them to be a little on the runnier side. You can also store the purée without thinning it first, and instead add breast milk or formula just before serving.
10.) Serve, refrigerate, or freeze immediately.
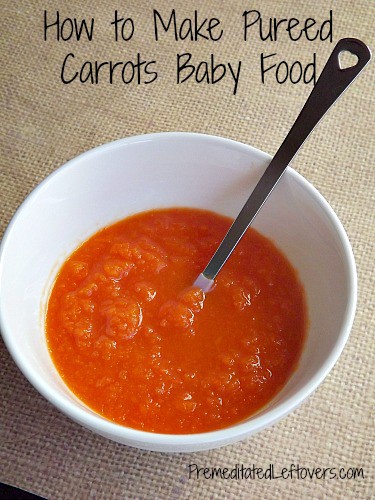
Puréed Carrots Baby Food
Ingredients and items needed:
- Raw, full sized carrots
- Water
- Basket steamer
- Medium to large saucepan or pot with lid
- Vegetable peeler
- Food processor or blender
Directions:
1.) Wash and peel the carrots and cut them into smaller pieces. The smaller the pieces the less time you will need to steam.
2.) Add just enough water to the pot to hit the bottom of the steamer basket and bring to a boil.
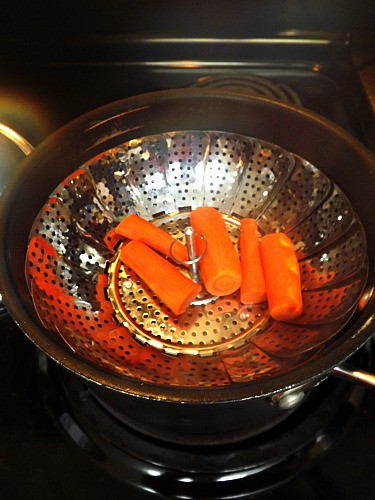
3.) Add the carrots to the basket and cover. Check the carrots in 10 to 15 minute increments by attempting to cut or stab with a fork. If they are still too hard to easily do so, continue to steam. Be careful to watch your water level, as it will decrease over the time.
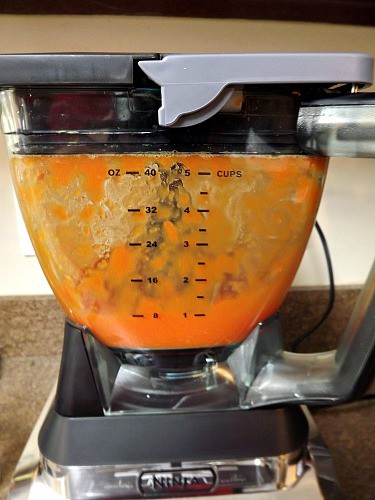
4.) Once the carrots are completely softened, remove and add to your food processor or blender. Purée until smooth.
5.) Add a small amount of water, breast milk, or formula until you reach the desired consistency. *Remember, when first introducing purées you’ll want them to be a little on the runnier side. You can also store the purée without thinning it first, and instead add breast milk or formula just before serving.
6.) Serve, refrigerate, or freeze immediately.
Once you have safely introduce each vegetable separately, don’t be afraid to be creative and purée your own vegetable combinations. Some to consider are sweet potato and corn; sweet potato and butternut squash; and peas and carrots.
Homemade Baby Food Recipes:
How to Make Baby Food Using Fruits
How to Make Baby Food with Meats
How to Get Started Making Homemade Baby Food
More Natural Baby Articles:
How to Make Reusable Cloth Baby Wipes
How to Save Money Using Cloth Diapers
Cloth Diapering: What You Need to Know to Get Started
Emily is a mother of two, Army wife, avid cook, and recently discovered running to help stay fit. She enjoys the outdoors and sharing her knowledge about greener living with others, including cloth diapering and up-cycling everyday objects into something fresh.

Sarah Martin says
How long is the homemade baby food good for once frozen?