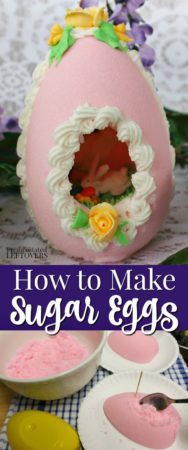
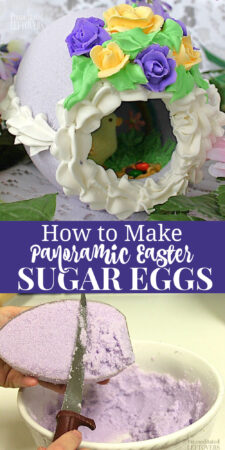
Use this step-by-step tutorial on how to make Sugar Eggs for Easter this year to learn how to make a sugar egg with a scene inside There are several elements explained in order: the panoramic sugar eggs themselves, the royal icing, the icing roses that go on top of the sugar eggs, and the icing bunnies that go inside the panoramic scene.

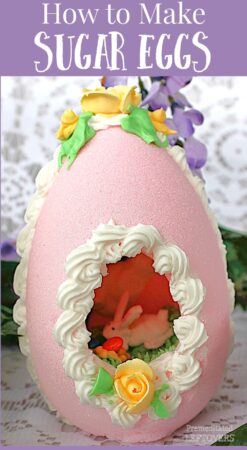
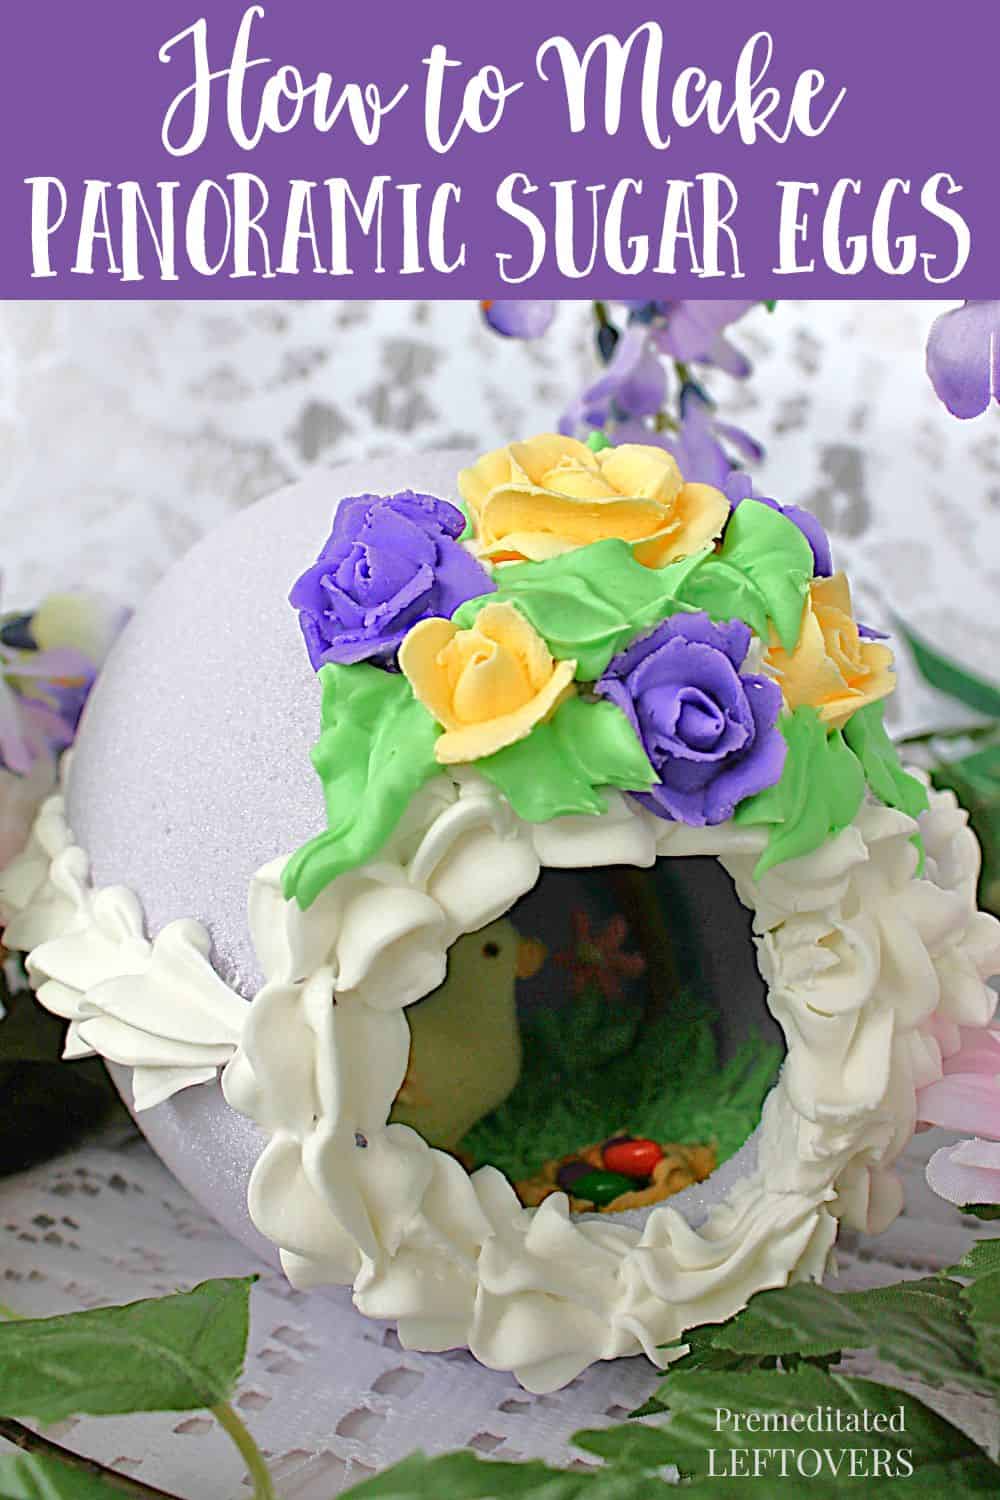
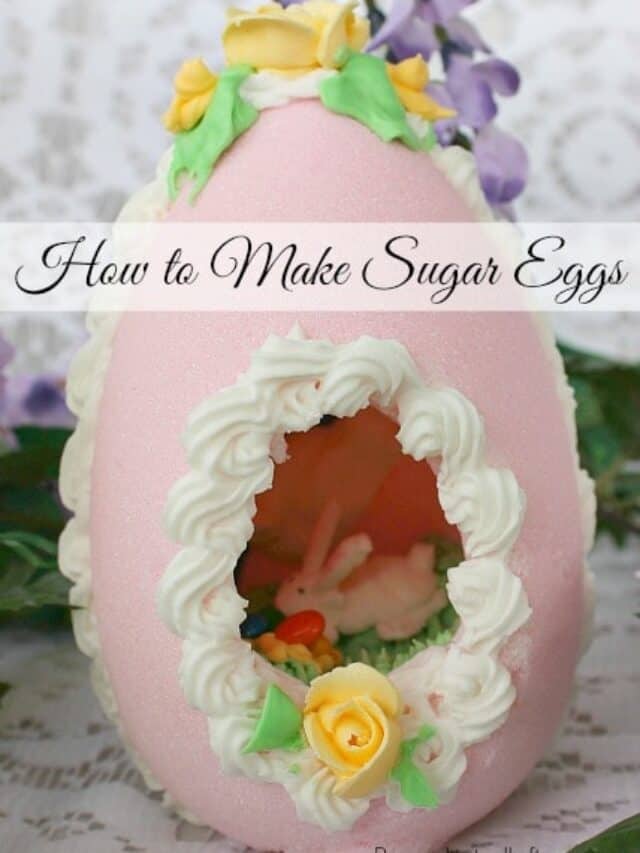
A beautifully decorated sugar egg is a delight for young and old alike. It is sparkly and dressed for spring on the outside, and has a lovely scene to discover on the inside.
Making the sugar egg shell is very simple and just requires sugar (regular is fine, but superfine sugar will make a more solid egg), water, and a little bit of food coloring if you choose to use it. Decorating and creating the panoramic scene can be as easy or complex as you desire. Store-bought candy flowers, edible Easter grass, and candy or toy miniatures will make the project go quickly. If you would like to exercise your creative side, make the decorations by hand using royal icing – or try experimenting with gum paste, fondant, or chocolate clay.
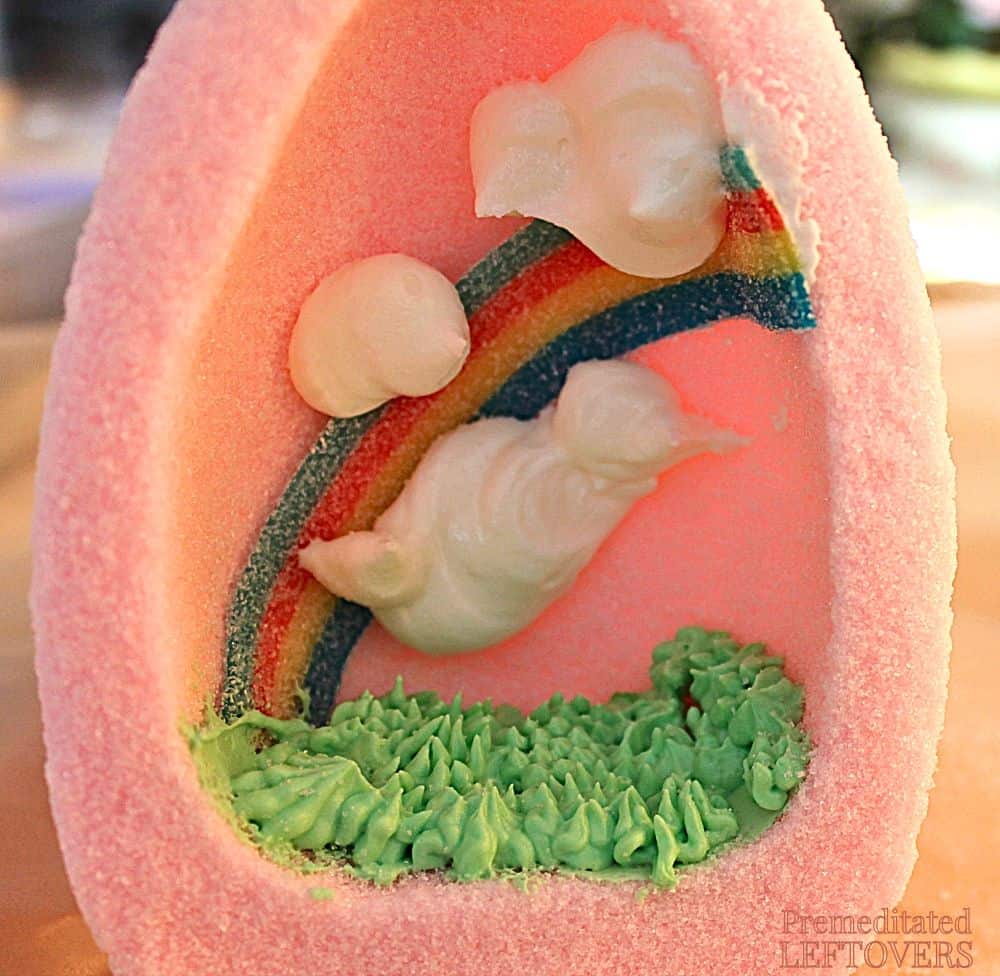
The sugar eggs pictured have candy coated sunflower seeds for the tiny eggs and sour licorice strips for the rainbow. Everything else was made from royal icing or sugar.
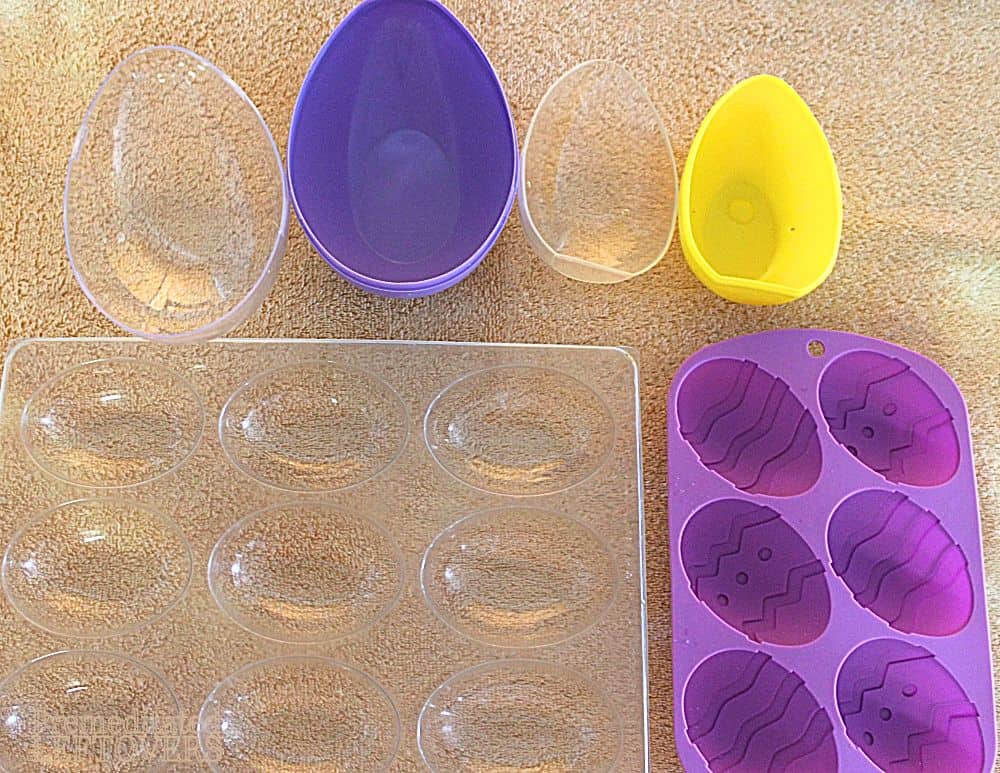
You can buy plastic egg molds that are made for this use, or find plastic eggs for sale with Easter grass and candy in them, which work perfectly. Some lay down with the view hole in the pointed end of the egg, and some stand up, with the vertical view hole in the front.
Depending on the size of your molds and how many you intend to make, you may need to increase the recipe below. Just add more sugar to the bowl and add a teaspoon of water at a time until the mixture holds together in your palm.
Make the royal icing first if you plan to make flowers, bunnies, or rainbows! And if you’re making more than one egg, you will want to double the recipe!
How to Make Sugar Eggs
Ingredients:
- 6 cups sugar (regular or superfine) Here is how to make superfine sugar.
- 3 tablespoons water
- Food coloring
Directions:
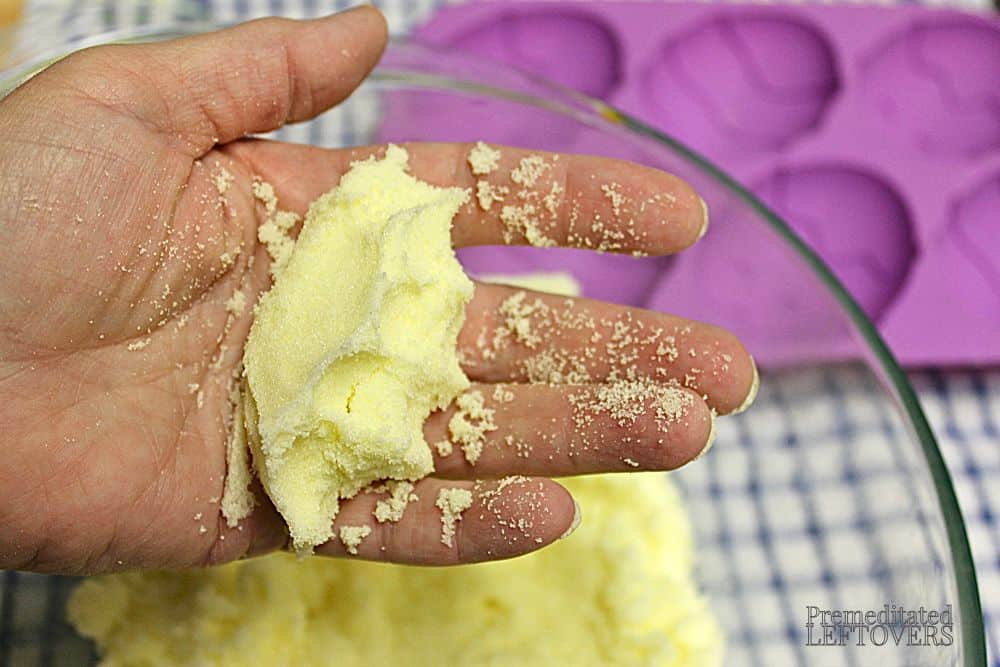
1. In a small dish, combine the water and enough food coloring to make a fairly rich color; it will appear lighter when mixed with the sugar.
2. Place sugar in a large bowl and drizzle the colored water in a little at a time, mixing well with an electric mixer. Add more or less water to make a mixture that will hold together in your hand when you squeeze it. Make sure it is very well combined so you don’t get any dark spots on your finished egg.
3. Pack the sugar firmly into plastic molds and level the top with a knife or spatula. Pat gently, and add more if necessary to achieve a firm, level top.
4. Cover with a sturdy paper plate, piece of cardboard, or baking sheet. Holding firmly, flip over and lift the mold carefully away. If the egg is cracked, scrape it back into the bowl, stir in a little more water, and try again. (Keep unused sugar covered with plastic wrap.)
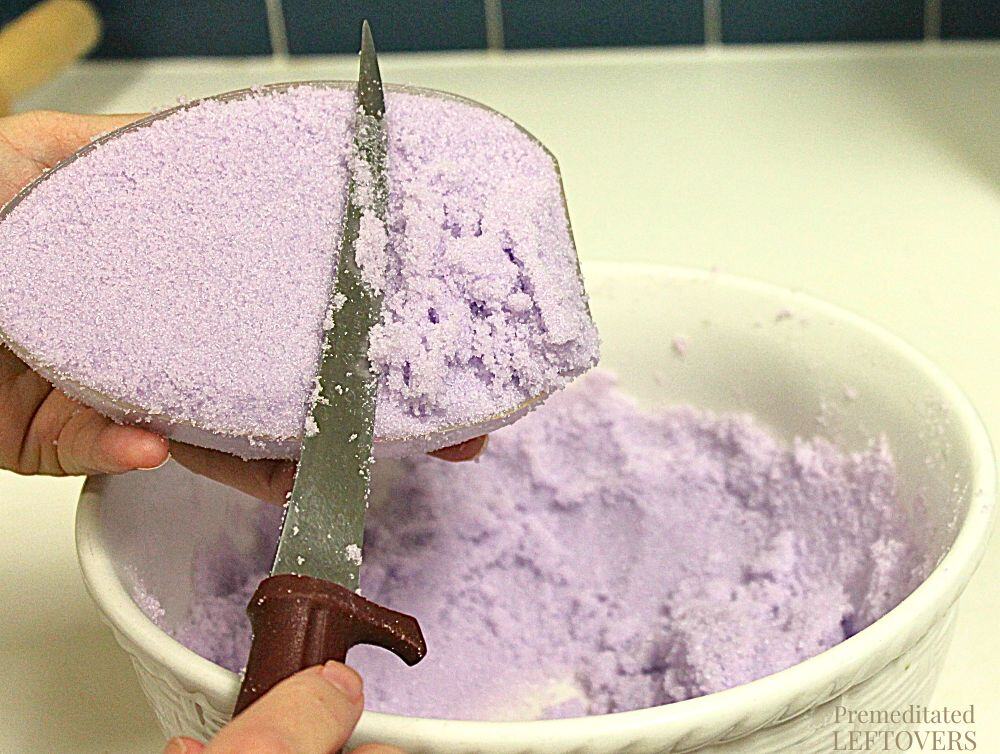
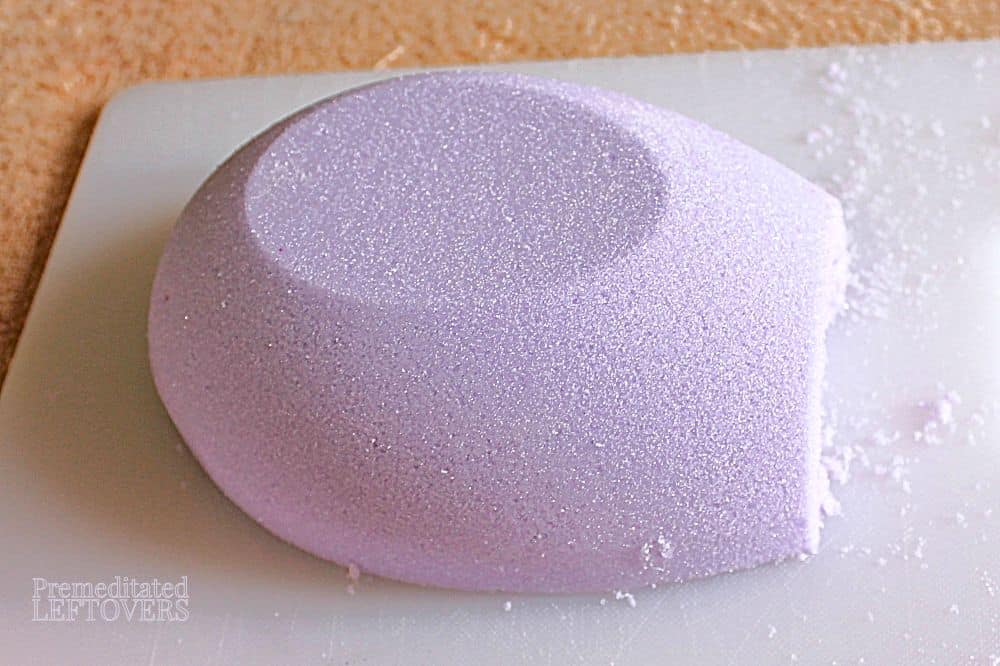
5. If you are making an egg that will lie horizontally, take a sharp knife and cut the tip off of both pieces. The amount you cut off varies with the size of the mold, so just make sure to cut enough to make a generous view hole.
6. For upright eggs: With a toothpick, mark a curved line between 1/4-inch and 1/2-inch from the top of the egg, following the curve. With a spoon, scoop a little bit out under the line where the view hole will be. This will make it a lot easier to work with when you are scooping out the egg.
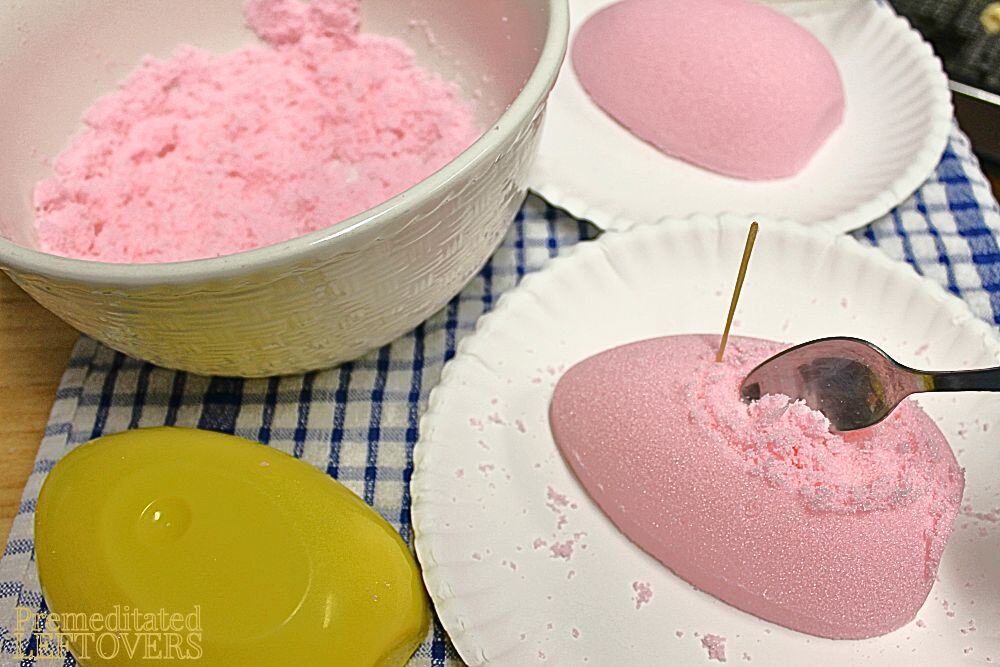
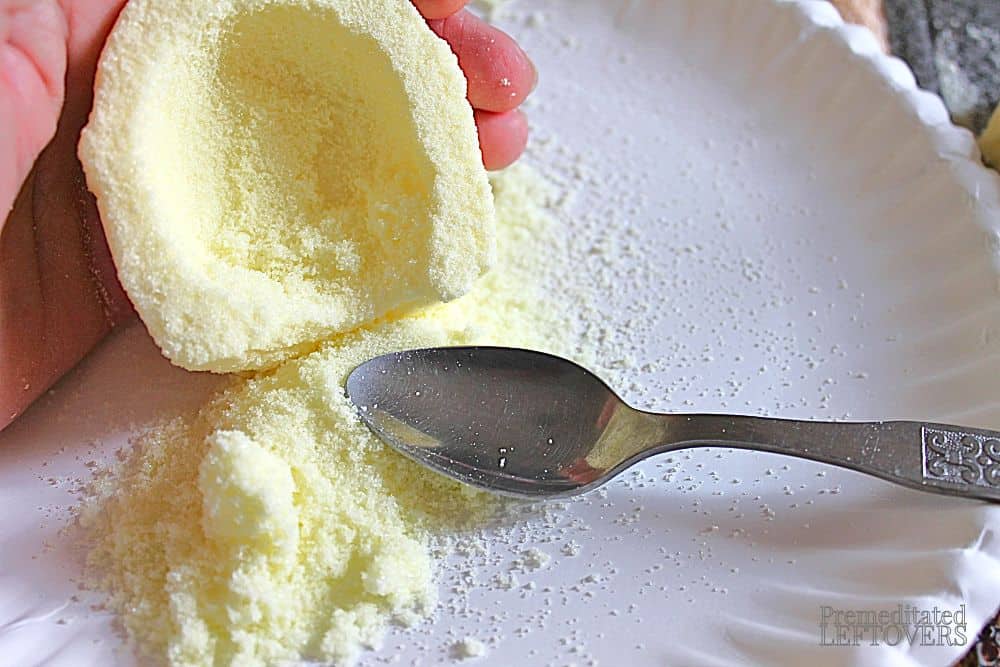
7. If you are making an upright egg, the mold should have a flat spot where the hole will be. After the egg is turned out of the mold, trace around the area with a toothpick and carefully scoop a small amount of the sugar out of the flat spot.

8. Let the eggs sit. If you want a sturdy egg, let it sit 3 hours. If you want to make a thinner (but a little more fragile) egg which will let more light inside, let it sit 2 hours. Hint: If you plan to make royal icing flowers or Easter decorations, now would be the perfect time, because they need to dry for several hours. Instructions below.
9. Pick up one egg half and turn it over, resting the curved top in the palm of one hand. With a spoon, beginning in the center, slowly scoop the soft sugar out. (This can be put back in the covered bowl and used for more eggs.) You will feel when you hit the hard crust. Go gently, scraping it smooth. For a horizontal egg: at the tip of the egg where you made the curved line, use a small sharp knife to gently scrape away any sugar outside of your line. When the two halves are put together, this is your peep hole! For an upright egg: you will need to carefully scrape out the opening in the center of the front half of the egg, using a small sharp knife. You may smooth it with a nail file if needed.
10. To decorate a horizontal egg: It’s fun to put a little blue icing on inside of the top shell for sky, and add some white icing clouds. Put a layer of green on the inside of the bottom shell. Add edible Easter grass, colored coconut, or royal icing grass, using green icing and a #233 decorating tip. To use the tip, start squeezing before you touch the tip down, and keep squeezing as you’re pulling up. Practice first on a piece of waxed paper. Add a rainbow if you like, by “gluing” a piece of multicolored sour licorice strip to the back of the egg with white icing–or pipe your own rainbow using several colors of icing and a round decorating tip. Add a simple scene.
11. To decorate an upright egg: Before you begin decorating, hold the egg halves together and judge how much space you have. Decorations may be placed on the bottom of both halves. Make sure the “floor” of the egg comes almost up to the bottom of the hole for best viewing. If necessary, you can fill it in with a little green icing. Add a simple scene.
12. Pipe white royal icing around the edge of one of the egg halves and press the two halves firmly together. Wipe any frosting from the outside of the egg. Let it dry several hours (or overnight) before decorating the outside.
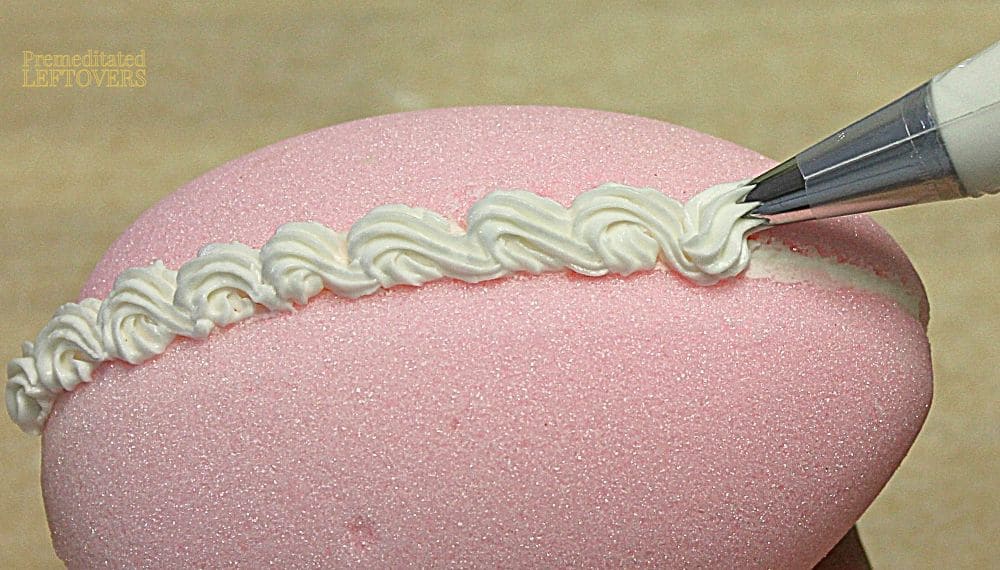
13. Pipe a decorative design around the seams of the egg and the viewing hole, using a tip that is an appropriate size for the egg. The edging for the large purple egg was made with a big “2D” drop flower tip, pushing backward while squeezing, and then letting off pressure while pulling forward. A #21 open star tip was used for the smaller pink egg, with a motion similar to making a number 9.
14. Add flowers, candy, or pipe a name on the outside of the egg. Let it dry thoroughly before moving it.
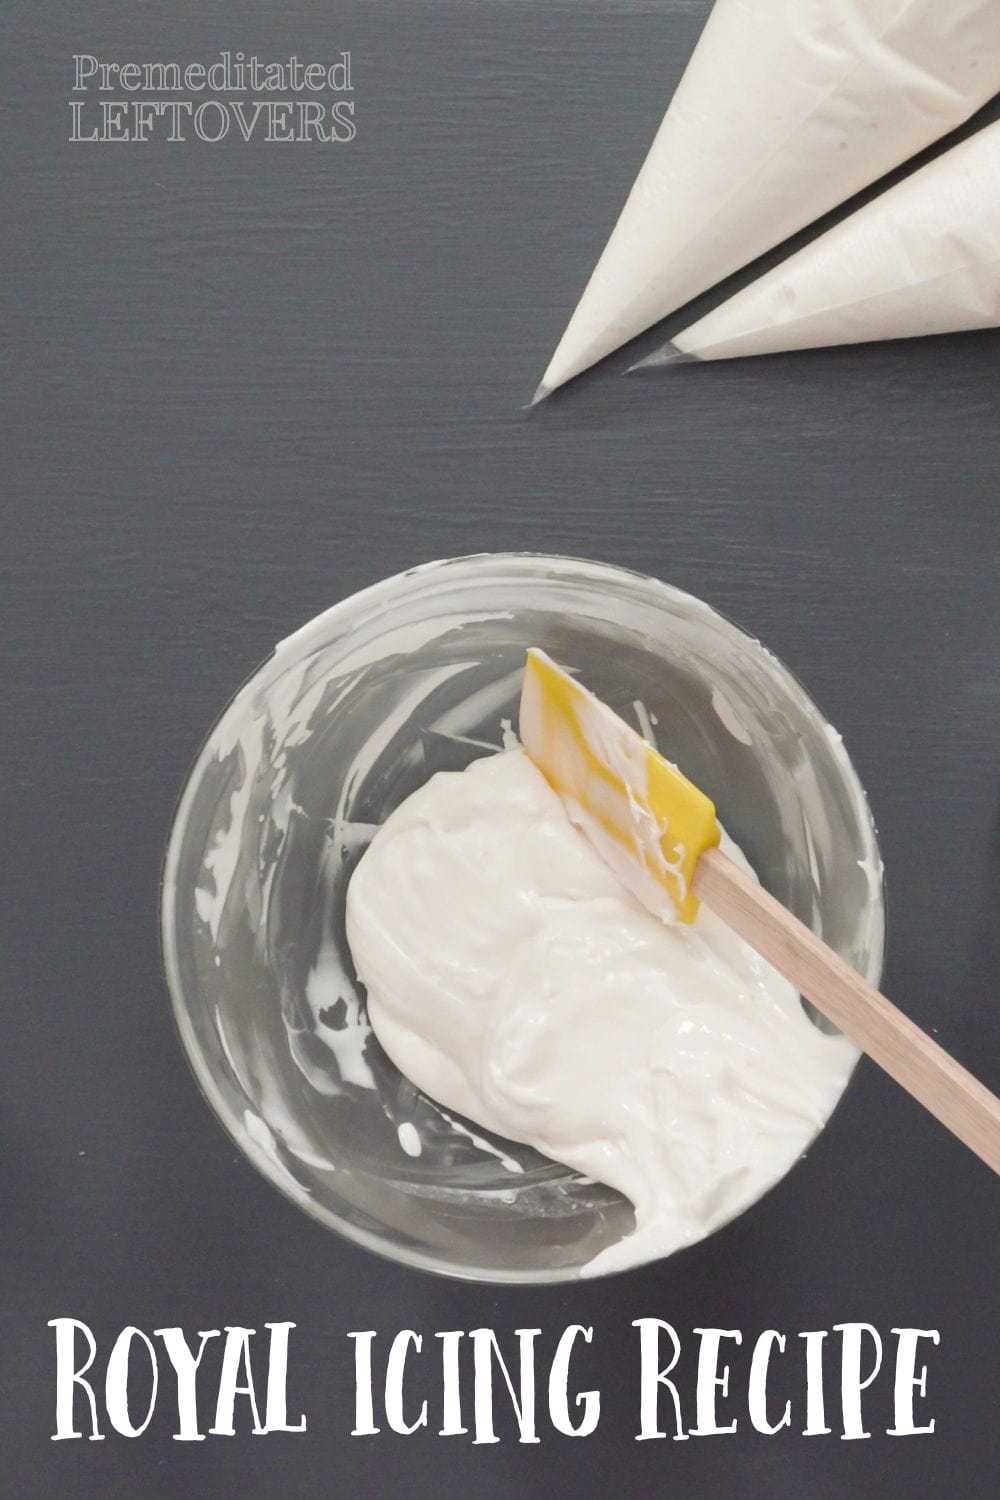
Royal Icing Recipe
Ingredients:
- 1 pound powdered sugar
- 2 tablespoons powdered egg whites (or 3 tablespoons meringue powder)
- 5 tablespoons water
- 1 teaspoon lemon juice (optional)
Directions:
- In a large bowl of a stand mixer, combine dry ingredients.
- Add water and beat with cookie paddle or whip for 7-10 minutes, or until stiff and glossy.
- Keep covered.
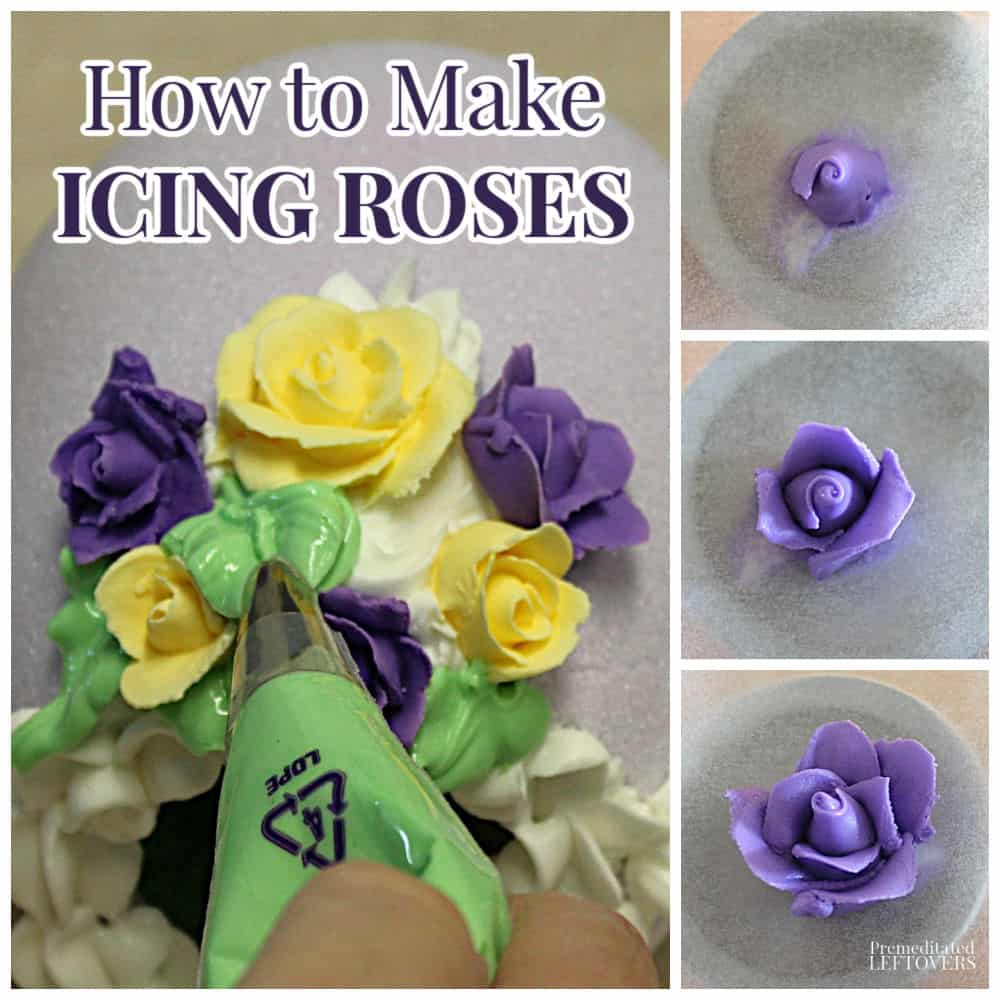
How to Make Icing Roses:
There are many good tutorials on the Internet for piping flowers and shapes, but here is a quick lesson.
Rose tips are wide at the base and narrow at the top. The roses used on these eggs were made with a #104 decorating tip. You may want to get a decorating tip set that includes the #352 Leaf Tip, so you can add leaves to your flowers.
Ingredients:
- Royal Icing (recipe above)
Materials:
- Icing Bag with a #104 decorating tip (or Plastic Bag with the tip cut off)
- Rose Nail (or Meat Thermometer)
- Waxed Paper
Directions:
- Cut a small stack of 1 ½-inch waxed paper squares. Put a little frosting on a rose nail (or a meat thermometer) and place a waxed paper square on the frosting. Put the desired color of frosting in a piping bag fitted with a rose tip.
- Always holding the wide side of the tip down, make a small cone in the middle of the paper, turning the stem of the rose nail as you work.
- Add 3 petals, squeezing the bag and overlapping the petals a little.
- Add another layer of 5 petals, staggering the beginning of the second row of petals so they are in between the first row (like laying bricks.)
- Add another layer if you wish.
- Slide the waxed paper and rose onto a flat surface.
- Repeat!
- Allow the flowers to dry for several hours.
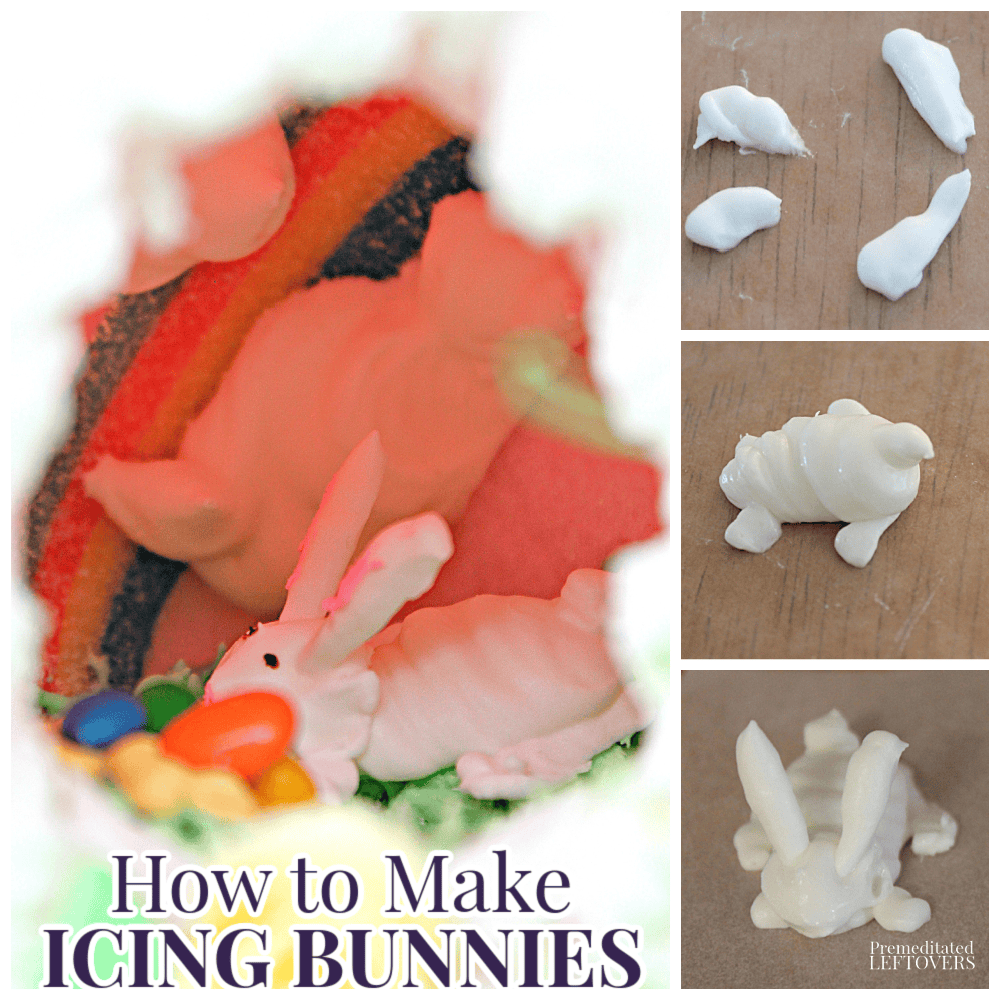
How to Make Icing Bunnies:
Ingredients:
- Royal Icing
Materials:
- Icing Bag with a Tube Tip (or Plastic Bag with the tip cut off)
- Waxed Paper
Directions:
- With a tube tip (or a sturdy plastic zipper bag with the tip cut off) squeeze out two small feet, and behind them, two larger legs on a small square of waxed paper.
- Add a pear-shaped body going from the front feet over the hind feet, allowing the frosting to build up as you go.
- On a separate piece of waxed paper, make several ears.
- Let the body and the ears dry for 1-2 hours.
- Add a head over the front legs and gently press the ears into it. You may have to hold them up for a minute or two if your frosting is soft.
- Let the bunny dry thoroughly. Give him eyes with a toothpick dipped in a little melted chocolate. (Microwave a couple of chocolate chips for 15-20 seconds for this) and paint the ears with a bit of pink icing.
The completed Sugar Eggs will last for a long time. If you wrap them up and protect them they will last for years. You won’t want to eat them, but the sugar acts as a preservative and will prevent them from rotting.
Printable Recipe for Panoramic Sugar Eggs
How to Make Sugar Eggs
Ingredients
- 6 cups sugar regular or superfine. Here is how to make superfine sugar.
- 3 tablespoons water
- Food coloring
Instructions
- In a small dish, combine the water and enough food coloring to make a fairly rich color; it will appear lighter when mixed with the sugar.
- Place sugar in a large bowl and drizzle the colored water in a little at a time, mixing well with an electric mixer. Add more or less water to make a mixture that will hold together in your hand when you squeeze it. Make sure it is very well combined so you don’t get any dark spots on your finished egg.
- Pack the sugar firmly into plastic molds and level the top with a knife or spatula. Pat gently, and add more if necessary to achieve a firm, level top.
- Cover with a sturdy paper plate, piece of cardboard, or baking sheet. Holding firmly, flip over and lift the mold carefully away. If the egg is cracked, scrape it back into the bowl, stir in a little more water, and try again. (Keep unused sugar covered with plastic wrap.)
- If you are making an egg that will lie horizontally, take a sharp knife and cut the tip off of both pieces. The amount you cut off varies with the size of the mold, so just make sure to cut enough to make a generous view hole.
- For upright eggs: With a toothpick, mark a curved line between 1/4-inch and 1/2-inch from the top of the egg, following the curve. With a spoon, scoop a little bit out under the line where the view hole will be. This will make it a lot easier to work with when you are scooping out the egg.
- If you are making an upright egg, the mold should have a flat spot where the hole will be. After the egg is turned out of the mold, trace around the area with a toothpick and carefully scoop a small amount of the sugar out of the flat spot.
- Let the eggs sit. If you want a sturdy egg, let it sit 3 hours. If you want to make a thinner (but a little more fragile) egg which will let more light inside, let it sit 2 hours. Hint: If you plan to make royal icing flowers or Easter decorations, now would be the perfect time, because they need to dry for several hours. Instructions below.
- Pick up one egg half and turn it over, resting the curved top in the palm of one hand. With a spoon, beginning in the center, slowly scoop the soft sugar out. (This can be put back in the covered bowl and used for more eggs.) You will feel when you hit the hard crust. Go gently, scraping it smooth. For a horizontal egg: at the tip of the egg where you made the curved line, use a small sharp knife to gently scrape away any sugar outside of your line. When the two halves are put together, this is your peep hole! For an upright egg: you will need to carefully scrape out the opening in the center of the front half of the egg, using a small sharp knife. You may smooth it with a nail file if needed.
- To decorate a horizontal egg: It’s fun to put a little blue icing on inside of the top shell for sky, and add some white icing clouds. Put a layer of green on the inside of the bottom shell. Add edible Easter grass, colored coconut, or royal icing grass, using green icing and a #233 decorating tip. To use the tip, start squeezing before you touch the tip down, and keep squeezing as you’re pulling up. Practice first on a piece of waxed paper. Add a rainbow if you like, by “gluing” a piece of multicolored sour licorice strip to the back of the egg with white icing–or pipe your own rainbow using several colors of icing and a round decorating tip. Add a simple scene.
- To decorate an upright egg: Before you begin decorating, hold the egg halves together and judge how much space you have. Decorations may be placed on the bottom of both halves. Make sure the “floor” of the egg comes almost up to the bottom of the hole for best viewing. If necessary, you can fill it in with a little green icing. Add a simple scene.
- Pipe white royal icing around the edge of one of the egg halves and press the two halves firmly together. Wipe any frosting from the outside of the egg. Let it dry several hours (or overnight) before decorating the outside.
- Pipe a decorative design around the seams of the egg and the viewing hole, using a tip that is an appropriate size for the egg. The edging for the large purple egg was made with a big "2D" drop flower tip, pushing backward while squeezing, and then letting off pressure while pulling forward. A #21 open star tip was used for the smaller pink egg, with a motion similar to making a number 9.
- Add flowers, candy, or pipe a name on the outside of the egg. Let it dry thoroughly before moving it.
Printable Recipe for Royal Icing
Royal Icing Recipe
Ingredients
- 1 pound powdered sugar
- 2 tablespoons powdered egg whites or 3 tablespoons meringue powder
- 5 tablespoons water
- 1 teaspoon lemon juice optional
Instructions
- In a large bowl of a stand mixer, combine dry ingredients.
- Add water and beat with cookie paddle or whip for 7-10 minutes, or until stiff and glossy.
- Keep covered.
Printable Recipe for Icing Roses
How to Make Icing Roses
Equipment
- Icing Bag with a #104 decorating tip (or Plastic Bag with the tip cut off)
- Rose Nail (or Meat Thermometer)
- Waxed Paper
Ingredients
- Royal Icing
Instructions
- Cut a small stack of 1 ½-inch waxed paper squares. Put a little frosting on a rose nail (or a meat thermometer) and place a waxed paper square on the frosting. Put the desired color of frosting in a piping bag fitted with a rose tip.
- Always holding the wide side of the tip down, make a small cone in the middle of the paper, turning the stem of the rose nail as you work.
- Add 3 petals, squeezing the bag and overlapping the petals a little.
- Add another layer of 5 petals, staggering the beginning of the second row of petals so they are in between the first row (like laying bricks.)
- Add another layer if you wish.
- Slide the waxed paper and rose onto a flat surface.
- Repeat!
- Allow the flowers to dry for several hours.
Notes
Printable Directions for Icing Bunnies
How to Make Icing Bunnies
Equipment
- Icing Bag with a Tube Tip (or Plastic Bag with the tip cut off)
- Waxed Paper
Ingredients
- Royal Icing
Instructions
- With a tube tip (or a sturdy plastic zipper bag with the tip cut off) squeeze out two small feet, and behind them, two larger legs on a small square of waxed paper.
- Add a pear-shaped body going from the front feet over the hind feet, allowing the frosting to build up as you go.
- On a separate piece of waxed paper, make several ears.
- Let the body and the ears dry for 1-2 hours.
- Add a head over the front legs and gently press the ears into it. You may have to hold them up for a minute or two if your frosting is soft.
- Let the bunny dry thoroughly. Give him eyes with a toothpick dipped in a little melted chocolate. (Microwave a couple of chocolate chips for 15-20 seconds for this) and paint the ears with a bit of pink icing.
More Easter Recipes
Easter Egg Rice Krispie Treats
Easy Resurrection Rolls Recipe
Easter White Chocolate Covered Pretzel Rods
Bunny Juice Gummy Fruit Recipe
How to Make Hollow Chocolate Easter Eggs
More DIY Easter Ideas
15 Ways to Decorate Easter Eggs
Tucked away in the Huckleberry Mountains of Washington State, Lorinda spends her time baking for her blog, The Rowdy Baker, and writes a monthly food column “Food for Thought” for Yummy Northwest. She was a competitor in Blogger Idol 2013 (no small feat for a food blogger) but prefers to gather her fame in the form of blue ribbons at the county fair. She bakes with abandon and watches the flour fly!


Peggy says
Wonderful tutorial, beautiful eggs. Thank you! 1
Kerryanne says
Alea, these sugar eggs really are the cutest and I imagined they’d be so much harder than they are.
Thank you for sharing your how-to at Create, Bake, Grow & Gather this week. I’m delighted to be featuring your sugared eggs recipe at tonight’s party and pinning too.
Hugs,
Kerryanne
Cindy@CountyRoad407 says
Wowza! This looks incredible. I’ve always wondered how people to these. Thank you for sharing it with us on Farmhouse Friday! I’ll be featuring it tomorrow! Hope you link up again soon. pinned
Pam says
This is a wonderful project! I’m happy to tell you I’ll be featuring this at Thursday Favorite Things on Thursday (starting at 10:00 a.m. Central Time.) 🙂
Melissa says
How long do these last?
Alea Milham says
They last for several weeks.
Sonya G Gardner says
They last forever. The color will fade some My grandchildren still have theirs and they are grown with children of their own….getting ready to make eggs for my great-grands
Sonya Gardner
Margaret MASHFORD says
Looking for a very long time how to make this Easter Egg. Any help gladly accepted
Lucy says
I made several of these with my kids about 20 years ago when they were young. My son has a Christmas birthday so we made one with a little plastic Santa inside and his name on top. We still have that one and it’s on display every Christmas! It’s a big project but it was so much fun.
Tracey says
My mom made these many years ago thanks for the memories
Marci Tenney says
I have a very old sugar Easter egg a student gave my grandmother – approximately 50 years ago. My grandmother gave it to my daughter. It has turned brown but the magical scene inside brings back memories from when I was young & we were permitted to hold it and look inside – very carefully. I am excited about making one to decorate with my daughter (grown now) to pass down. Memories are so important, whether remembering them or making new ones.
Shelly says
My grandmother and her friends used to make these over 55 years ago. They would spend all day on them. They were magical for me.
Brandi Clevinger says
These are so beautiful! You have a unique talent and very creative. I’ve always wondered how these are made.
Thanks for sharing at Inspire Me Mondays.
Audrey says
I have always wanted to make one and you make it sound so easy! Pinned it.
Found this on You’re Gonna Love It.
Lauren says
This brings back memories of when I was a child, receiving one of these from my teacher. I was so amazed at the work put into it, and still remember that very fondly!
Angie says
My neighbor used to make these when I was growing up. I was always so fascinated with them. Your tutorial is great! Thanks for sharing on Something To Talk About link party! Hope to see you next Monday!
Aspen Jay says
Oh my goodness! I remember these eggs when I was a child but haven’t seen them since. Thanks so much for putting this tutorial together. I don’t know if I will make them this year, but definitely pinning this for in the future!
Kate says
We used to make these in school when I was little for Easter and that was @ 50yrs ago. Thank-you for reminding me how much fun they were to make!!!!
Kristen O. says
Wow!!! That is the best tutorial that I’ve seen for these. Thanks for posting it. 🙂
Laura Dembowski says
These are spectacular! I don’t know if I’d have the courage to give them a try, but I sure would like t!
Dawn Lopez says
Wow Alea, these are simply magnificent! What a wonderful idea 😉